


create the lxc and passthrough the gpu to it
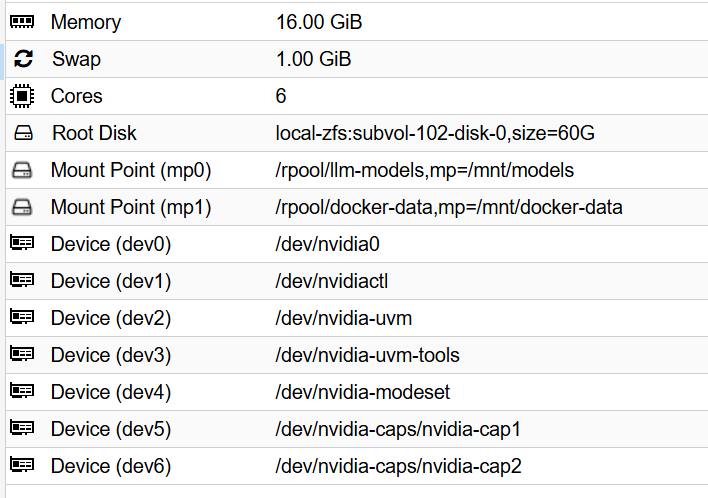
dev0: /dev/nvidia0
dev1: /dev/nvidiactl
dev2: /dev/nvidia-uvm
dev3: /dev/nvidia-uvm-tools
#dev4: /dev/nvidia-modeset
dev5: /dev/nvidia-caps/nvidia-cap1
dev6: /dev/nvidia-caps/nvidia-cap2
- Add NVIDIA devices by cli (requires container to be stopped)
pct stop 100
pct set 100 --dev0 /dev/nvidia0
pct set 100 --dev1 /dev/nvidiactl
pct set 100 --dev2 /dev/nvidia-uvm
pct set 100 --dev3 /dev/nvidia-uvm-tools
#pct set 100 --dev4 /dev/nvidia-modeset
pct set 100 --dev5 /dev/nvidia-caps/nvidia-cap1
pct set 100 --dev6 /dev/nvidia-caps/nvidia-cap2
download the module and apps in host
apt update && apt upgrade -y && apt install pve-headers-$(uname -r) build-essential software-properties-common make nvtop htop -y
update-initramfs -u && reboot
download the driver for host and lxc
nvidia.com/en-us/drivers
https://us.download.nvidia.com/XFree86/Linux-x86_64/580.119.02/NVIDIA-Linux-x86_64-580.119.02.run
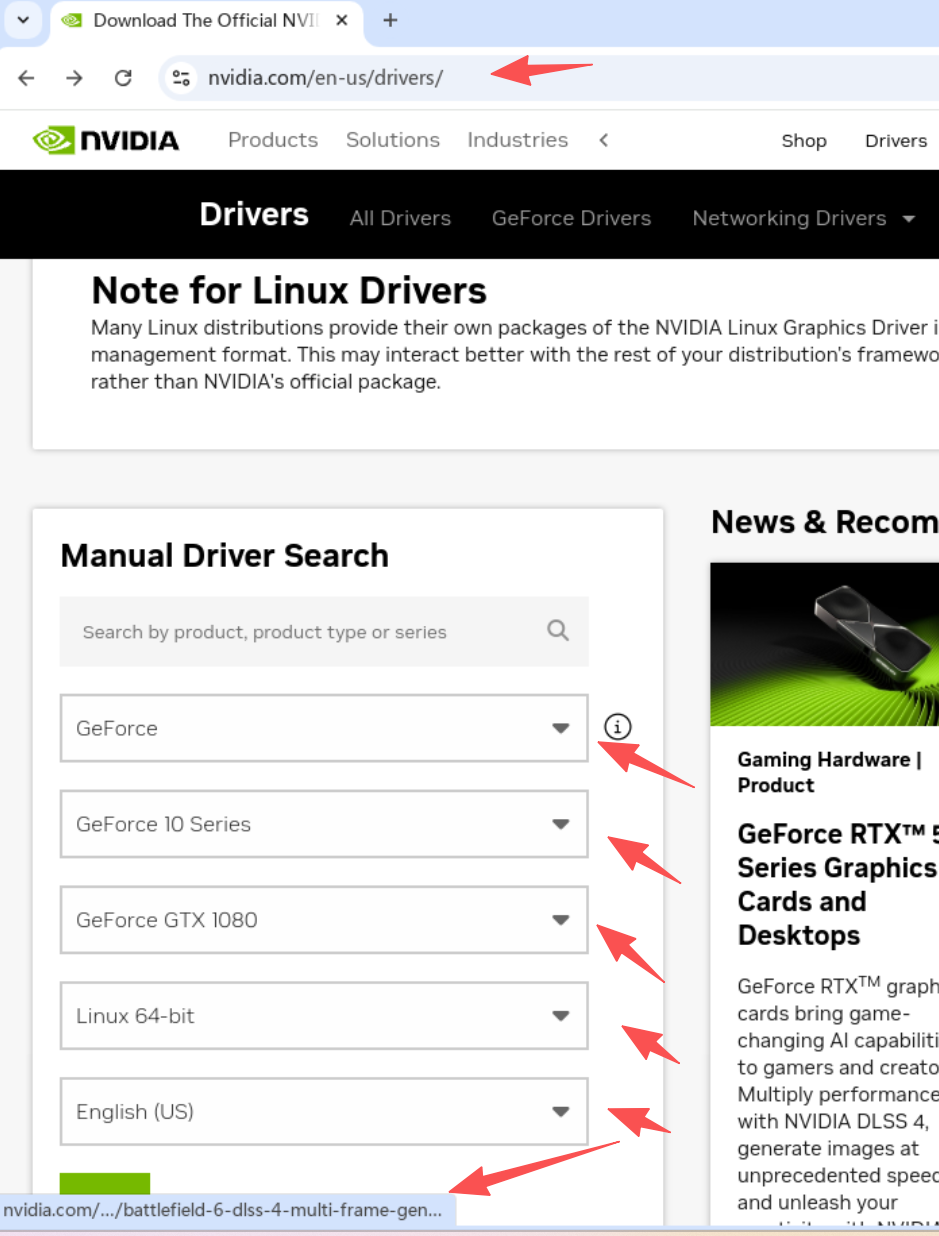
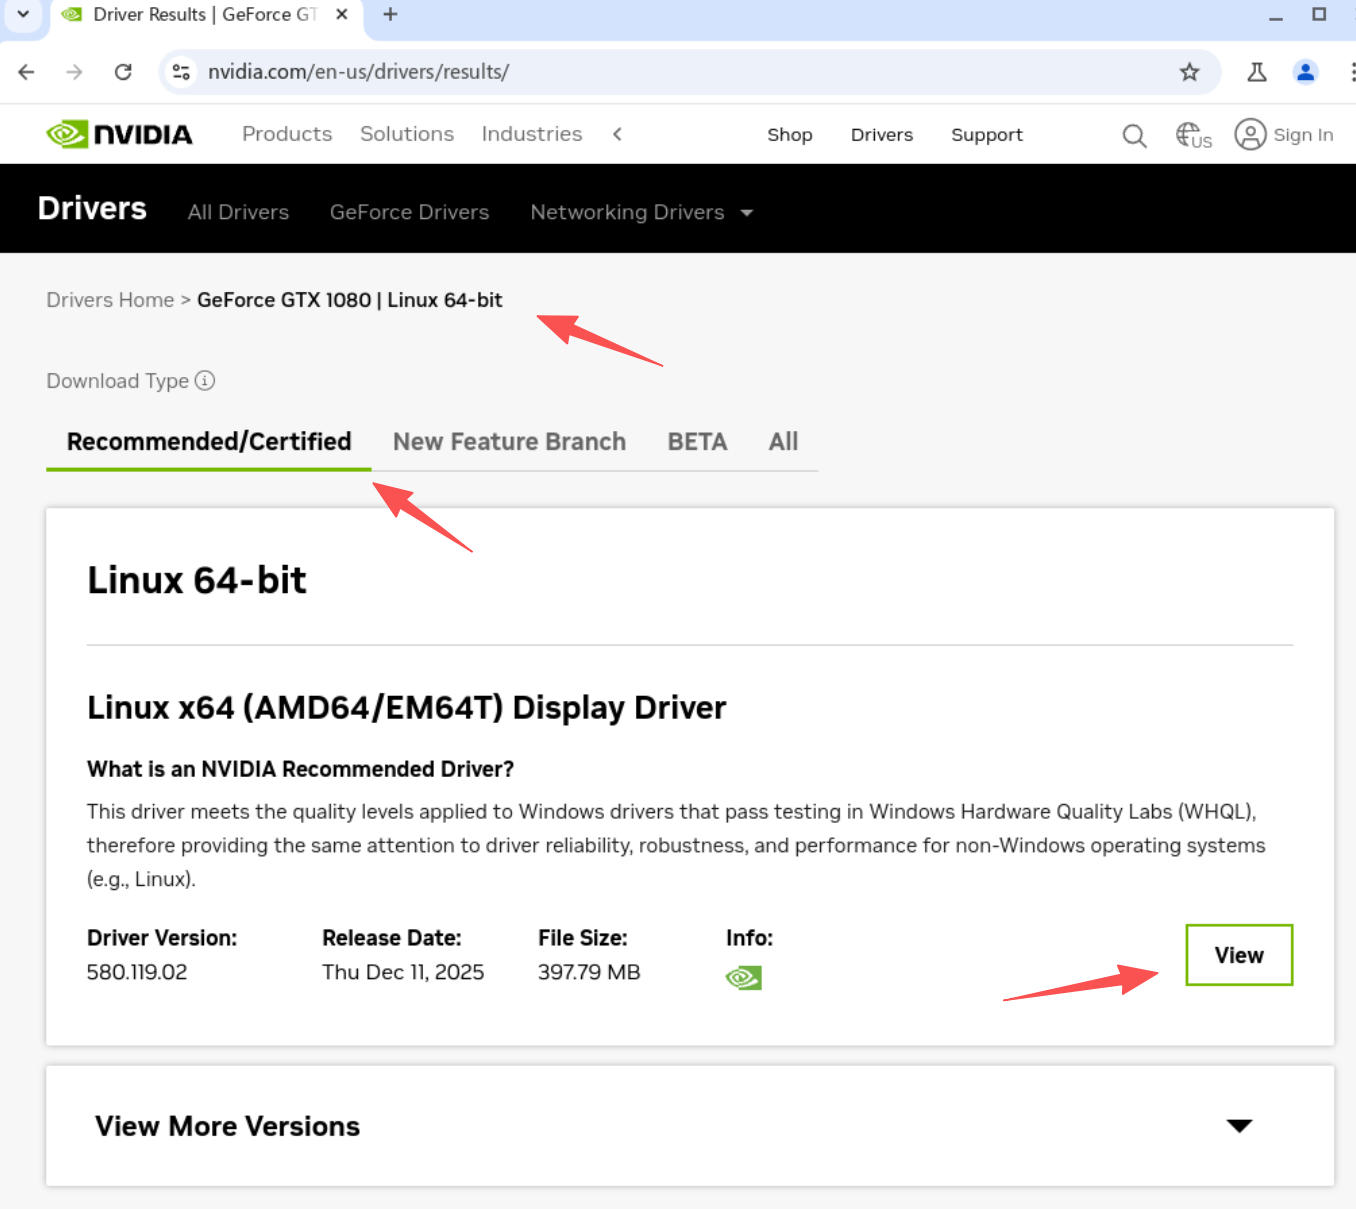
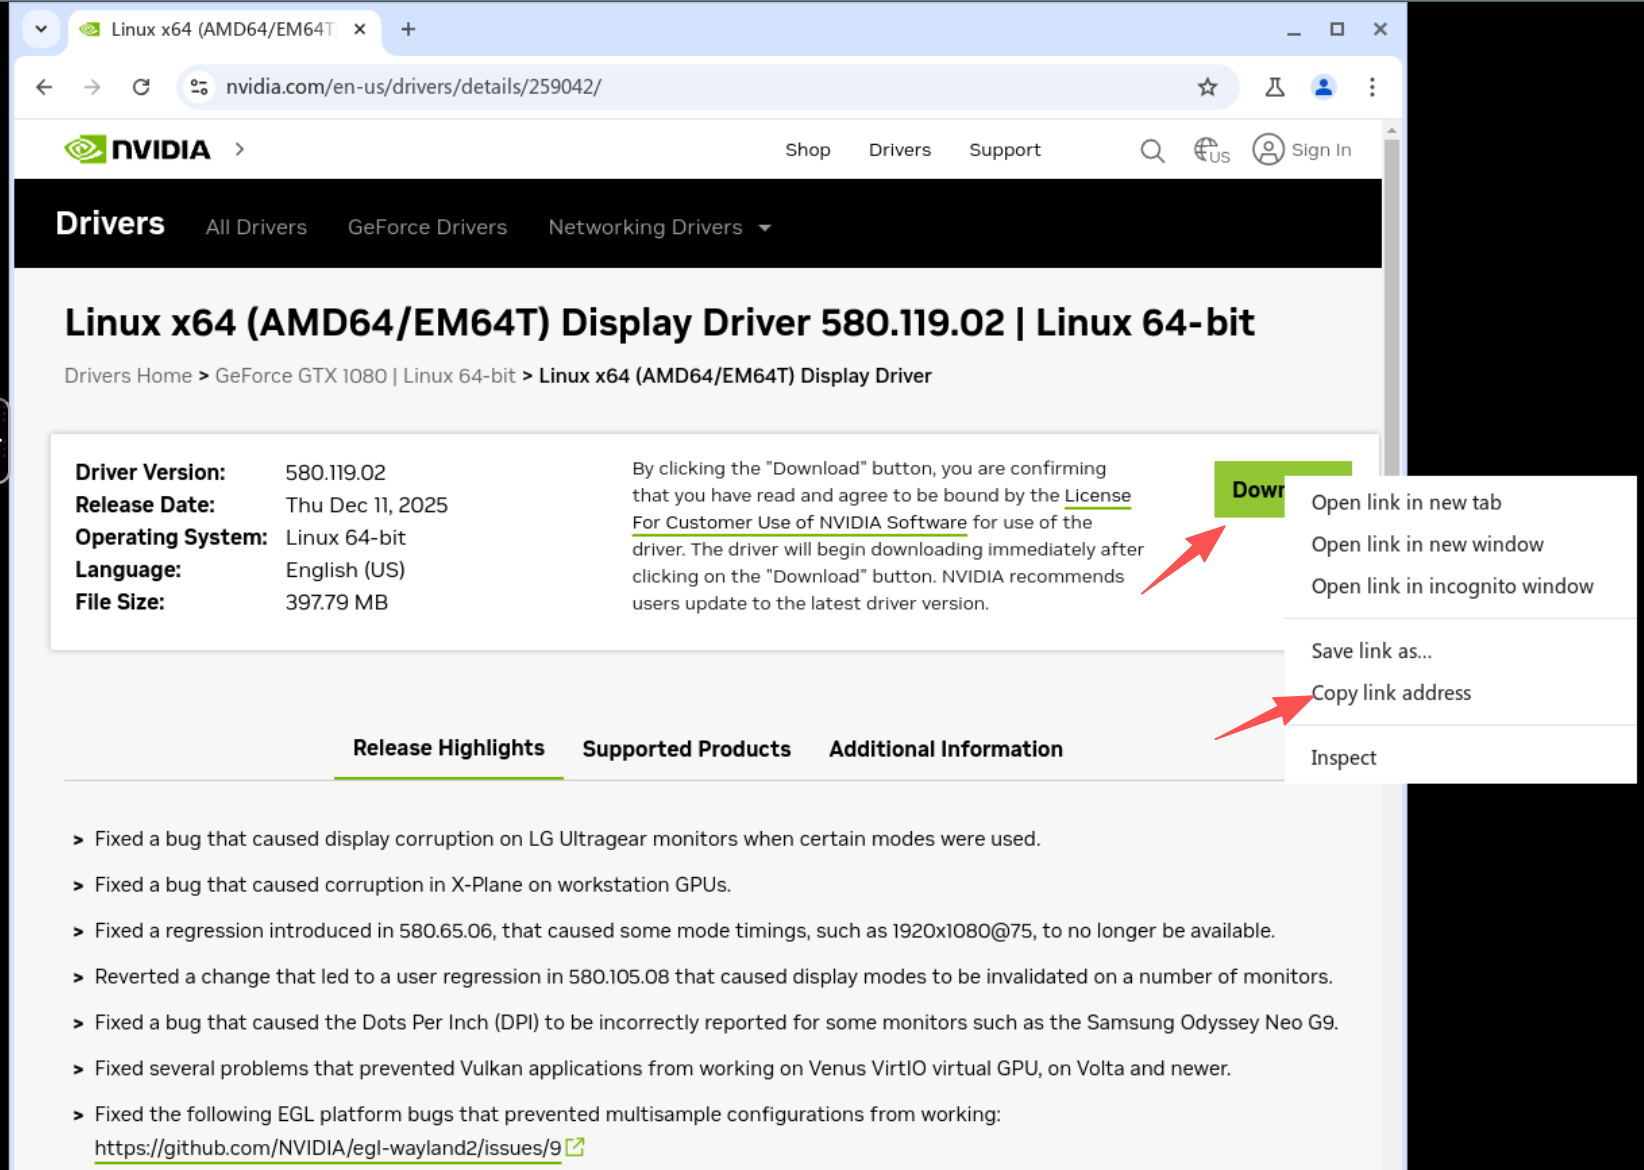
find the download link and wget download
wget HTTP://URLHERE
chmod +x xxxxx.run
./xxxxx.run --dkms #no for lxc
use pct command in host to copy the driver from host to lxc
root@pve:~# pct push 101 NVIDIA-Linux-x86_64-xxxx.run /root/NVIDIA-Linux-x86_64-xxxx.run
tools install in lxc
apt install g++ freeglut3-dev build-essential libx11-dev libxmu-dev libxi-dev libglu1-mesa-dev libfreeimage-dev gpg libglfw3-dev wget htop btop nvtop nano glances git pciutils cmake curl zstd libcurl4-openssl-dev dkms make -y && update-initramfs -u
install the driver in lxc with “no-kernel-modules” flag
./NVIDIA-Linux-x86_64-580.119.02.run --no-kernel-modules
Install the NVIDIA Container Toolkit (no neccessary)
- Add the repository
curl -fsSL https://nvidia.github.io/libnvidia-container/gpgkey | sudo gpg --dearmor -o /usr/share/keyrings/nvidia-container-toolkit-keyring.gpg
curl -s -L https://nvidia.github.io/libnvidia-container/stable/deb/nvidia-container-toolkit.list | \
  sed 's#deb https://#deb [signed-by=/usr/share/keyrings/nvidia-container-toolkit-keyring.gpg] https://#g' | \
  sudo tee /etc/apt/sources.list.d/nvidia-container-toolkit.list
- Update and install (no neccessary)
apt-get update
apt-get install -y nvidia-container-toolkit
apt install --no-install-recommends nvtop
Edit the config.toml and enable the no-cgroups and set it to true from false. (no neccessary)
nano /etc/nvidia-container-runtime/config.toml
#no-cgroups = false
to
no-cgroups = true
install ollama
curl -fsSL https://ollama.com/install.sh | sh
update the ollama model path
sudo mkdir -p /etc/systemd/system/ollama.service.d
sudo nano /etc/systemd/system/ollama.service.d/override.conf
[Service]
Environment="OLLAMA_MODELS=/path/to/your/models"
sudo chown -R ollama:ollama /path/to/your/models
install openclaw
curl -fsSL https://openclaw.ai/install.sh | bash
openclaw troubleshooting command
# 1. Stop the existing gateway process
openclaw gateway stop

# 2. Kill any orphaned Ollama processes to clear VRAM
# (Sometimes Ollama keeps a ghost model loaded)
pkill ollama

# 3. Start the gateway fresh in "Verbose" mode to see what's happening
openclaw gateway start --verbose

# 4. Check if OpenClaw can actually see the model through the API bridge
openclaw models status --probe --probe-provider ollama

# 5. Check if Ollama is actually being called
ollama ps# While you wait for OpenClaw to respond

# 6. Force-load the model into VRAM
ollama run gemma3:12b "Hi"

# 7. Verify it's staying in memory
ollama ps

# 8. OpenClaw sends a very large instruction set. If your Ollama setup is restricted to the default 4096 context, it will fail silently. Open your config: nano /root/.openclaw/openclaw.json Ensure your ollama provider section includes a larger context:
"ollama": {
  "num_ctx": 32768
}

# 9. Cli chat to renew or reset current conversation
openclaw tui
type /new or /reset

# 10. If the TUI doesn't load or remains frozen, you need to manually delete the session file that's causing the bottleneck
# a. Stop the gateway
openclaw gateway stop

# b. Clear the session cache
rm -rf ~/.openclaw/agents/main/sessions/*

# c. Restart the gateway
openclaw gateway start

# 11. Verify the "Handshake" with Ollama
journalctl --user -u openclaw-gateway.service -f

# 12.  Stop the supervised service
openclaw gateway stop || systemctl --user stop openclaw-gateway.service

# 13.  Force kill any process stuck on the OpenClaw port
ss -lptn 'sport = :18789'

# 14.  Kill any orphaned node processes that might be hanging
pkill -9 node

systemctl --user disable --now openclaw-gateway.service

ss -lptn 'sport = :18789'

openclaw gateway run --verbose

systemctl --user enable --now openclaw-gateway.service
lxc docker installation
- Ensure prerequisites are installed
apt update && apt install -y ca-certificates curl gnupg
- Download the GPG key correctly (Note the standard dashes)
curl -fsSL https://download.docker.com/linux/debian/gpg | gpg --dearmor -o /etc/apt/trusted.gpg.d/docker.gpg
- Set permissions
chmod a+r /etc/apt/trusted.gpg.d/docker.gpg
- Write the source list (Note the straight quotes and standard dashes)
echo "deb [arch=$(dpkg --print-architecture) signed-by=/etc/apt/trusted.gpg.d/docker.gpg] https://download.docker.com/linux/debian bookworm stable" | tee /etc/apt/sources.list.d/docker.list > /dev/null
- Update and Install
apt update &&
apt install -y docker-ce docker-ce-cli containerd.io docker-buildx-plugin docker-compose-plugin
- Config the gpu run at pcie3.0
nvidia-smi -p 0
- Set the GPU to “Prefer Maximum Performance”
nvidia-smi -pm 1
- Enable Persistence Mode (keeps the driver loaded)
nvidia-smi -p 0
simple docker deploy from official script
curl -fsSL https://get.docker.com -o get-docker.sh
sudo sh get-docker.sh
sudo apt install docker-compose-plugin
# 建立 docker 群組(通常安裝時已建立,若無則補上)
sudo groupadd docker

# 將當前使用者 ($USER) 加入該群組
sudo usermod -aG docker $USER
config the lxc permission
- Open your LXC config (replace 102 with your ID)
nano /etc/pve/lxc/102.conf
- Add this line to the very bottom:
lxc.apparmor.profile: unconfined
- Configure AppArmor profile (requires editing config file directly)
cat >> /etc/pve/lxc/100.conf << EOF
lxc.apparmor.profile: unconfined
EOF
- Save and Exit.
- Restart the LXC entirely.
pct stop 102
pct start 102
special volume config in dockge comment for the zfs optimized data set,
https://halo.gocat.top/archives/zfsraid0-she-zhi
dockge compose
services:
dockge:
image: louislam/dockge:latest
restart: always
ports:
- 5001:5001
volumes:
- /var/run/docker.sock:/var/run/docker.sock
- /mnt/docker-data/dockge:/app/data # Fast 16k storage
- /mnt/docker-data/stacks:/opt/stacks # Fast 16k storage
# (Optional) Map the models folder directly into your LLM container
- /mnt/models:/models # Efficient 1M storage
environment:
- DOCKGE_STACKS_DIR=/opt/stacks
ai-stack batch deployment yml
services:
  ollama:
    image: ollama/ollama:latest
    container_name: ollama
    restart: always
    volumes:
      - /mnt/models/ollama:/root/.ollama
    deploy:
      resources:
        reservations:
          devices:
            - driver: nvidia
              count: all
              capabilities: [gpu]

  open-webui:
    image: ghcr.io/open-webui/open-webui:main
    container_name: open-webui
    restart: always
    ports:
      - 3000:8080
    volumes:
      - /mnt/docker-data/stacks/ai-lab/open-webui:/app/backend/data
    environment:
      - OLLAMA_BASE_URL=http://ollama:11434
      - ENABLE_RAG_WEB_SEARCH=True
      - RAG_WEB_SEARCH_ENGINE=searxng
      - SEARXNG_QUERY_URL=http://searxng:8080/search?q=<query>
    depends_on:
      - ollama
      - searxng

  searxng:
    image: searxng/searxng:latest
    container_name: searxng
    restart: always
    volumes:
      # MUST be a file on host, not a directory
      - /mnt/docker-data/stacks/ai-lab/searxng/settings.yml:/etc/searxng/settings.yml
    environment:
      - SEARXNG_BASE_URL=http://searxng:8080

  comfyui:
    image: yanwk/comfyui-boot:cu124-slim
    container_name: comfyui
    restart: always
    ports:
      - 8188:8188
    volumes:
      - /mnt/models/comfyui_data/models:/opt/ComfyUI/models #zfs dataset 1m
      - /mnt/docker-data/comfyui/custom_nodes:/opt/ComfyUI/custom_nodes #zfs dataset 16k
      - /mnt/docker-data/comfyui/input:/opt/ComfyUI/input #zfs dataset 16k
      - /mnt/docker-data/comfyui/output:/opt/ComfyUI/output #zfs dataset 16k
      - /mnt/docker-data/comfyui/workflows:/opt/ComfyUI/workflows #zfs dataset 16k
    deploy:
      resources:
        reservations:
          devices:
            - driver: nvidia
              count: all
              capabilities: [gpu]
Tools
This tells the open-webui container to ping the ollama container
docker exec -it ai-lab-open-webui-1 ping -c 3 ollama
SearXNG config for openwebui
find the config file ls -la searxng/setting.yml # Check where the directory
Find the search: section and add json to the formats:
nano settings.yml
search:
  formats:
    - html
    - json #add this
docker restart searxng
verify the config is done
curl -v "http://localhost:8081/search?q=proxmox&format=json"
-
What to look for: You should see a huge wall of text starting with {“query”: “proxmox”, “number_of_results”: …
-
If you get an error or HTML: It means the settings.yml edit we did (adding - json) didn’t take effect. Ensure you restarted the container with docker restart searxng.
docker exec -it open-webui curl "http://host.docker.internal:8081/search?q=test&format=json"
-
Success: If you see JSON data here, it means the network bridge is perfect. Open WebUI has a clear path to your search engine.
-
Failure: If it says “Connection Refused,” we need to check if you used the --add-host=host.docker.internal:host-gateway flag when you created the Open WebUI container.
update in Open WebUI Settings
-
Navigate to Settings > Admin Settings > Web Search.
-
Ensure your SearXNG Query URL is exactly this:
http://host.docker.internal:8081/search?q=<query>&format=json
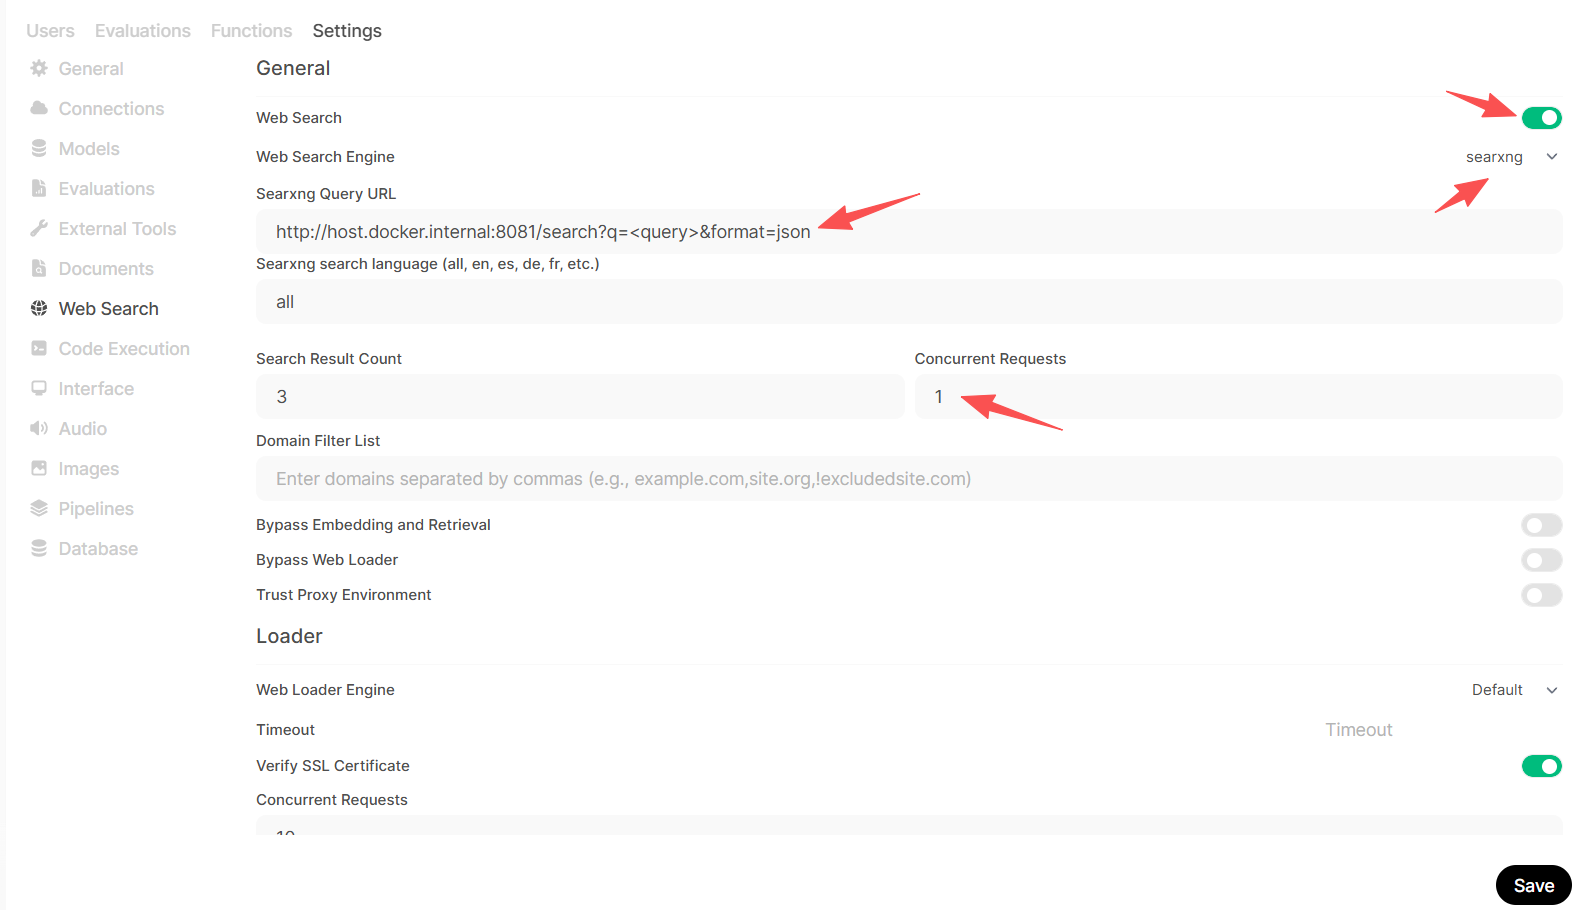
Click the Refresh/Test button if available, then click Save.
refer:
https://digitalspaceport.com/proxmox-lxc-docker-gpu-passthrough-setup-guide/
full stack
services:
  ollama:
    image: ollama/ollama
    container_name: ollama
    restart: unless-stopped

    deploy:
      resources:
        reservations:
          devices:
            - capabilities: [gpu]

    volumes:
      - /mnt/models/ollama_data:/root/.ollama

    ports:
      - "11434:11434"

  searxng:
    image: searxng/searxng:latest
    container_name: searxng
    restart: unless-stopped

    environment:
      - BASE_URL=http://searxng:8080/
      - INSTANCE_NAME=my-private-search

    volumes:
      - /mnt/docker-data/searxng:/etc/searxng

    ports:
      - "8080:8080"

  open-webui:
    image: ghcr.io/open-webui/open-webui:main
    container_name: open-webui
    restart: unless-stopped

    depends_on:
      - ollama
      - searxng

    environment:
      - UID=1000
      - GID=1000
      - OLLAMA_BASE_URL=http://ollama:11434
      - WEBUI_SEARCH_ENGINE=searxng
      - SEARXNG_BASE_URL=http://searxng:8080

    volumes:
      - /mnt/docker-data/open-webui:/app/backend/data

    ports:
      - "3000:8080"

    extra_hosts:
      - "host.docker.internal:host-gateway"
评论区