


pve 安装盘扩容命令
- 删除
lvremove pve/data
- 扩容
lvextend -l +100%FREE -r pve/root
删除订阅弹窗
sed -Ezi.bak "s/(Ext.Msg.show\(\{\s+title: gettext\('No valid sub)/void\(\{ \/\/\1/g" /usr/share/javascript/proxmox-widget-toolkit/proxmoxlib.js && systemctl restart pveproxy.service
- 执行后清理浏览器缓存,重新登录验证。
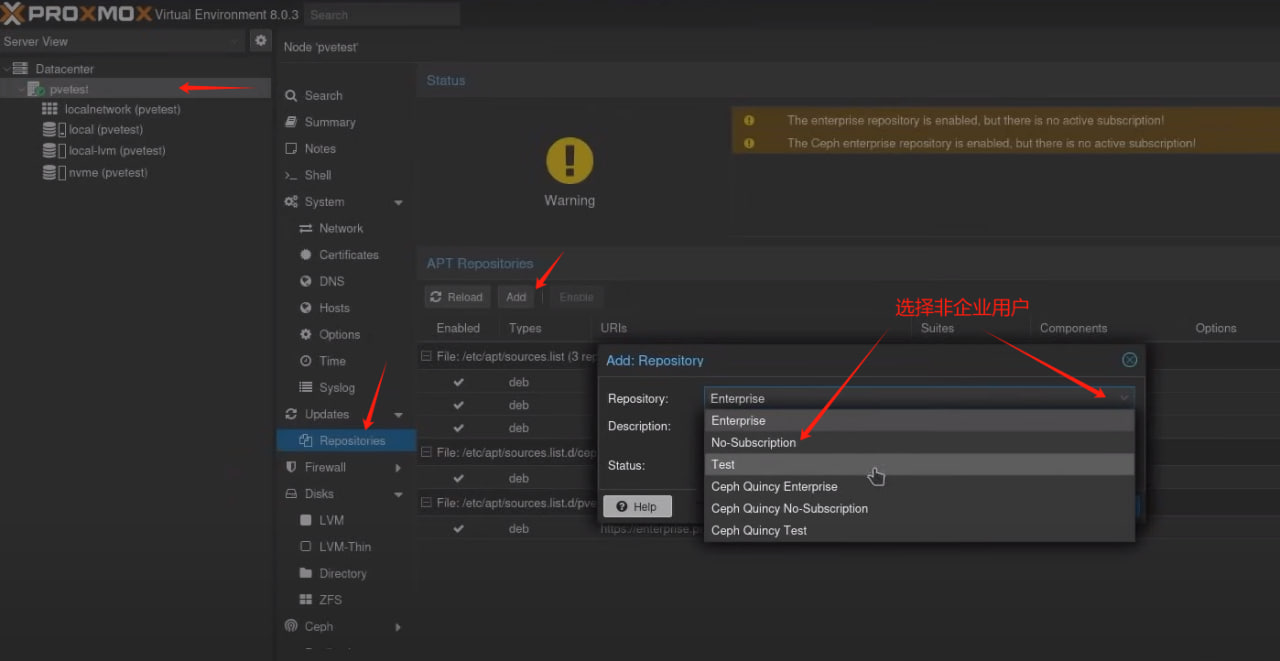
修改软件源
mv /etc/apt/sources.list.d/pve-enterprise.list /etc/apt/sources.list.d/pve-enterprise.list.bak
屏蔽订阅企业源
wget https://mirrors.ustc.edu.cn/proxmox/debian/proxmox-release-bookworm.gpg -O /etc/apt/trusted.gpg.d/proxmox-release-bookworm.gpg
echo "deb https://mirrors.ustc.edu.cn/proxmox/debian bookworm pve-no-subscription" > /etc/apt/sources.list.d/pve-no-subscription.list
使用Proxmox非企业版中科大源
sed -i 's|^deb http://ftp.debian.org|deb https://mirrors.ustc.edu.cn|g' /etc/apt/sources.list
sed -i 's|^deb http://security.debian.org|deb https://mirrors.ustc.edu.cn/debian-security|g' /etc/apt/sources.list
将Debian官方源替换为中科大源
echo "deb https://mirrors.ustc.edu.cn/proxmox/debian/ceph-quincy bookworm no-subscription" > /etc/apt/sources.list.d/ceph.list
替换Ceph源
sed -i 's|http://download.proxmox.com|https://mirrors.ustc.edu.cn/proxmox|g' /usr/share/perl5/PVE/APLInfo.pm
替换CT镜像下载源(重启PVE才能生效)
- 更新源列表
apt update
- 升级软件包
apt upgrade
- 升级系统
apt dist-upgrade
- 安装OVS
apt install openvswitch-switch
清华PVE
https://mirrors.tuna.tsinghua.edu.cn/proxmox/iso/
- 将自带的源文件sources.list备份
cp /etc/apt/sources.list /etc/apt/sources.list_bak
- 编辑sources.list
nano /etc/apt/sources.list
deb https://mirrors.tuna.tsinghua.edu.cn/debian/ bookworm main contrib non-free non-free-firmware
deb https://mirrors.tuna.tsinghua.edu.cn/debian/ bookworm-updates main contrib non-free non-free-firmware
deb https://mirrors.tuna.tsinghua.edu.cn/debian/ bookworm-backports main contrib non-free non-free-firmware
deb https://mirrors.tuna.tsinghua.edu.cn/debian-security bookworm-security main contrib non-free non-free-firmware
编辑企业源,增加pve无订阅源
nano /etc/apt/sources.list.d/pve-enterprise.list
- 将其中原有的proxmox句首加# 注释掉,变为:#deb https://enterprise.proxmox.com/debian/pve bookworm pve-enterprise
添加以下清华源:
deb https://mirrors.tuna.tsinghua.edu.cn/proxmox/debian/pve bookworm pve-no-subscription
LXC模板替换为清华源
sed -i 's|http://download.proxmox.com|https://mirrors.tuna.tsinghua.edu.cn/proxmox|g' /usr/share/perl5/PVE/APLInfo.pm
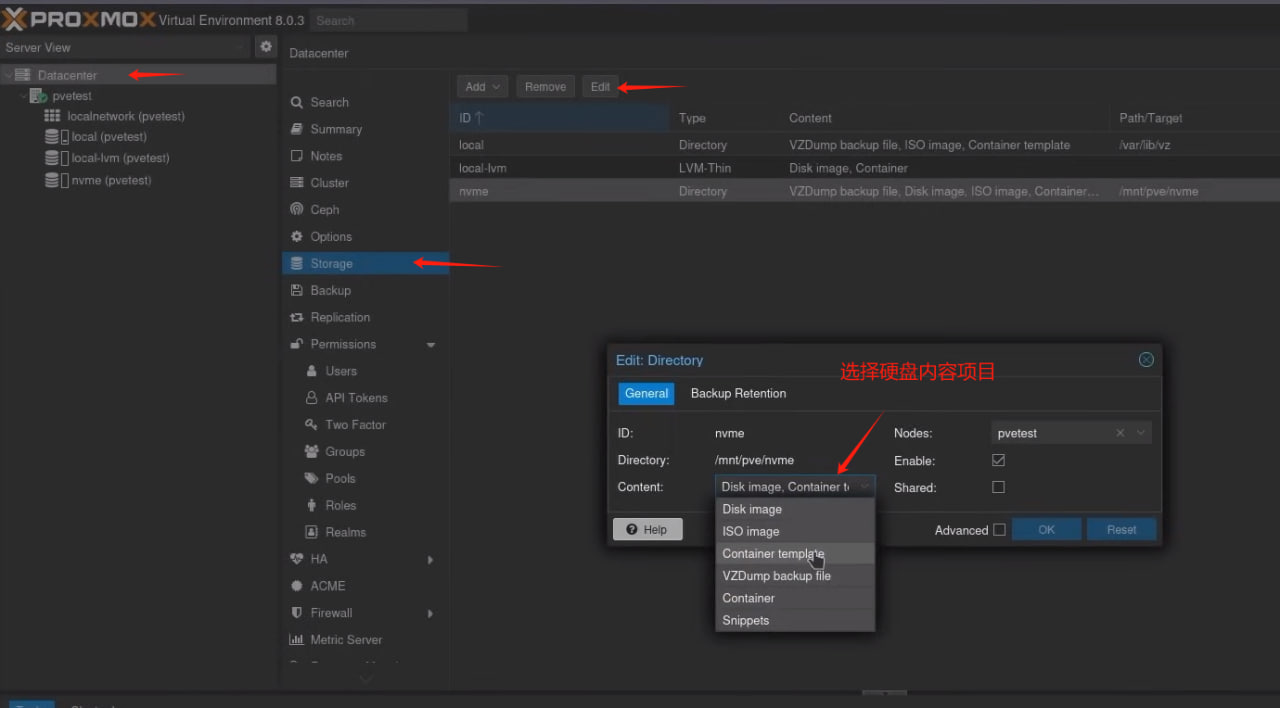
-
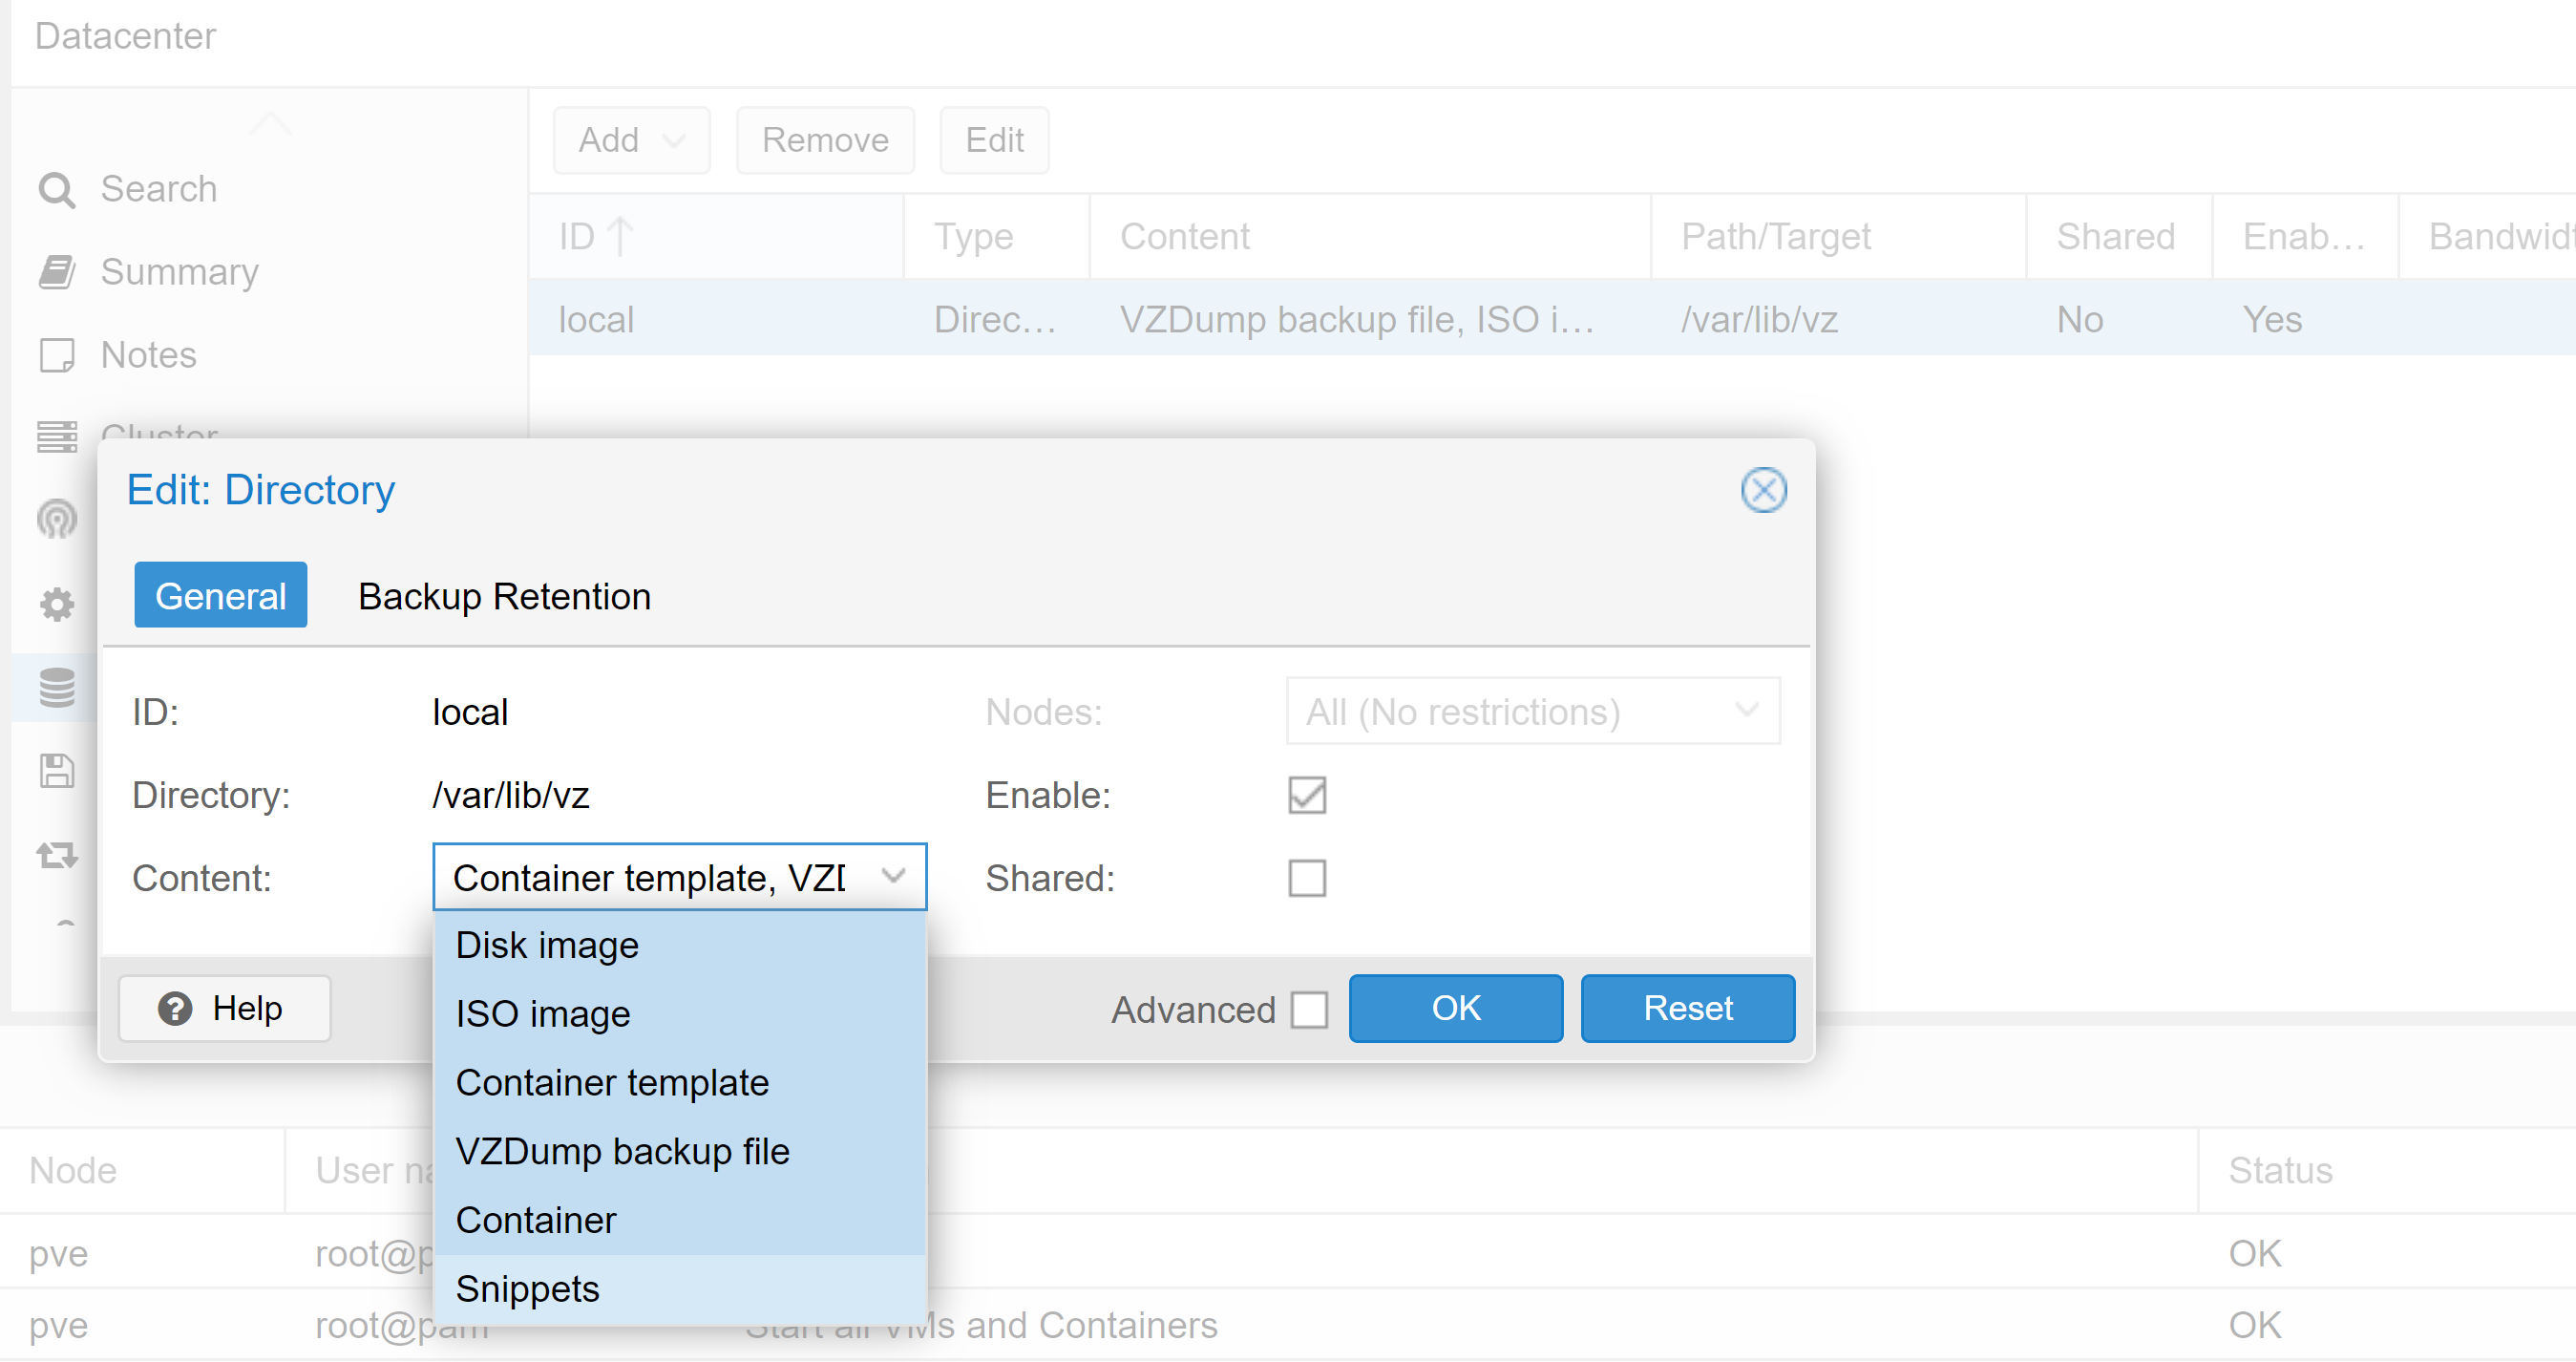
进入DATACENTER删除和设置分区
-
导入镜像文件到虚拟机
qm importdisk 100 /var/lib/vz/template/iso/arc.img local
- 列出PCI设备
ls /dev/disk/by-id
- 找到硬盘型号后,导入SATA设备到虚拟机,黑群晖才可以完整使用硬盘,好处是重装黑群晖之后硬盘内容也可以在新装黑群晖中使用,不会遗失文件
qm set 100 -sata2 /dev/disk/by-id/ata-WDC_WD5000AAKX-08U6AA0_WD-WMC2E8240732
- pve减少服务命令,增加可用内存:
systemctl stop pve-ha-lrm.service
systemctl stop pve-ha-crm.service
systemctl disable pve-ha-lrm.service
systemctl disable pve-ha-crm.service
systemctl disable pve-firewall.service
systemctl stop pve-firewall.service
systemctl stop pvescheduler.service
systemctl disable pvescheduler.service
systemctl stop spiceproxy.service
systemctl disable spiceproxy.service
- 启用ipv6, 将下列配置加入/etc/sysctl.conf
net.ipv6.conf.all.forwarding=1
net.ipv6.conf.all.accept_ra=2
net.ipv6.conf.default.accept_ra=2
net.ipv6.conf.vmbr0.accept_ra=2
net.ipv6.conf.all.autoconf=1
net.ipv6.conf.default.autoconf=1
net.ipv6.conf.vmbr0.autoconf=1
sysctl -p
参考:https://songxwn.com/PVE-apt-source/
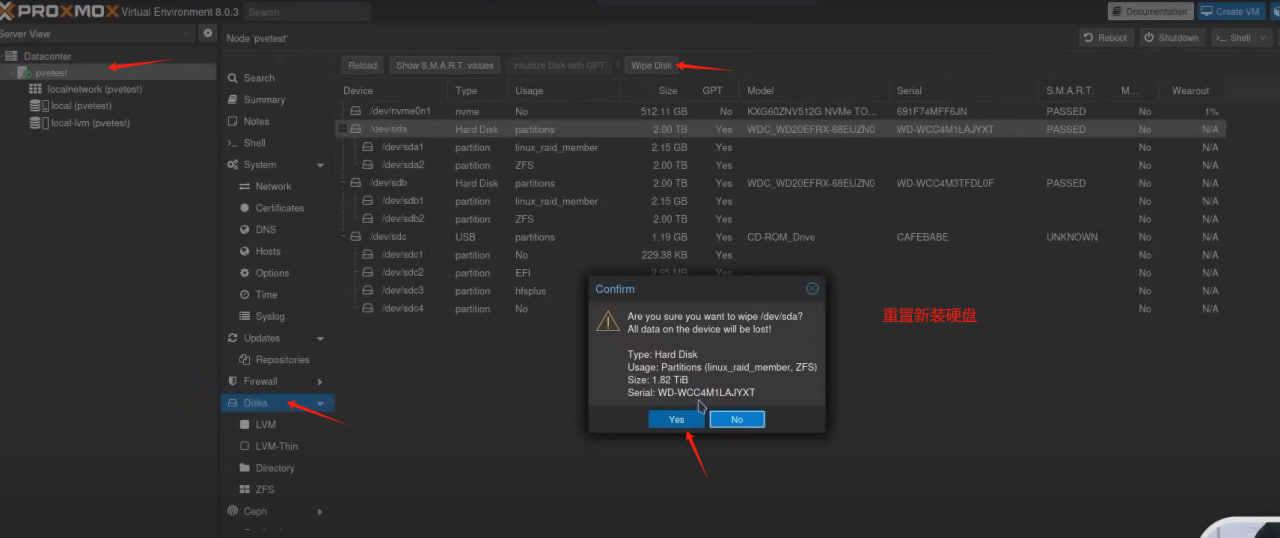
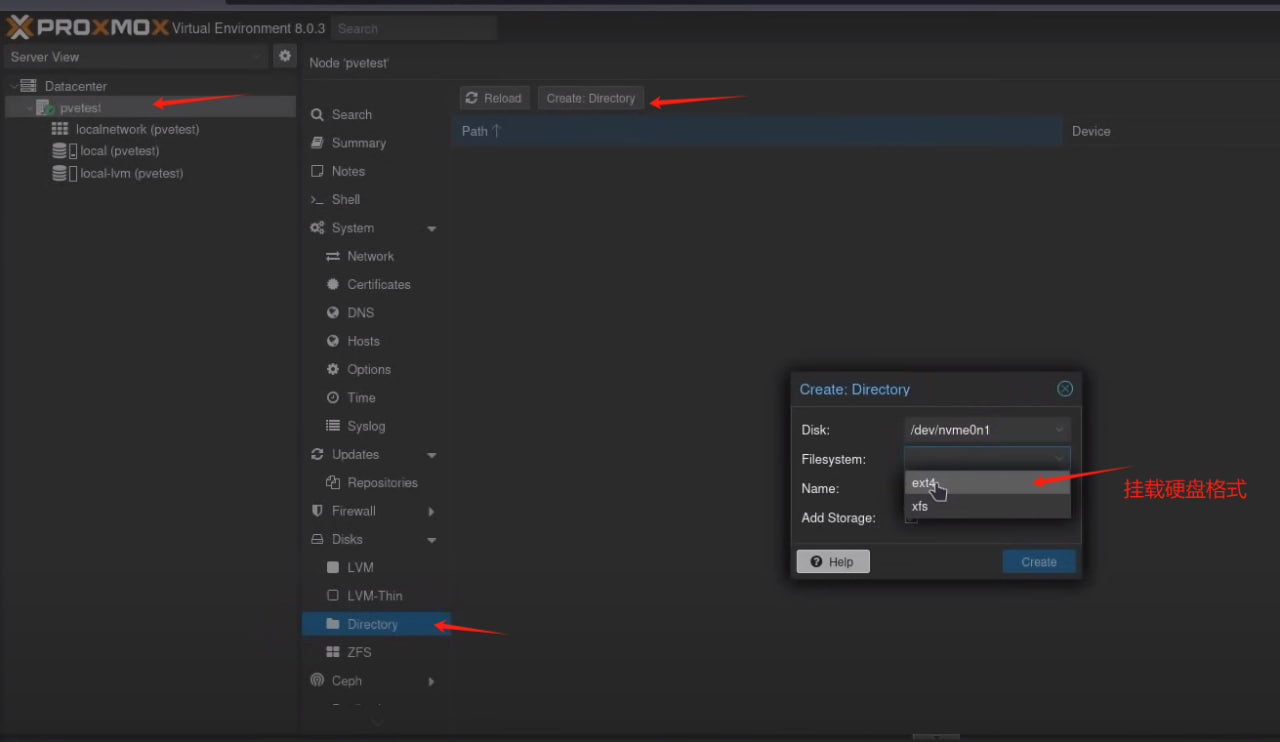
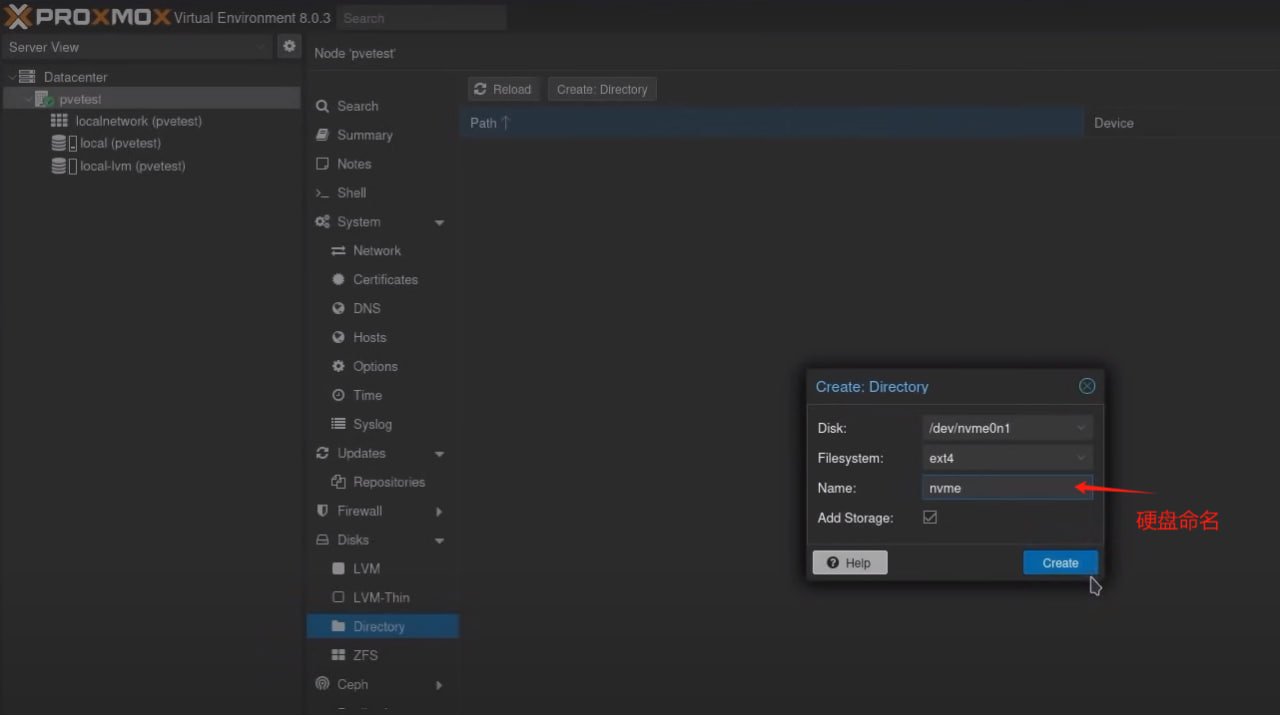
挂载新硬盘

删除企业用户订阅
- 云服务器安装PVE
- 安装前需要纯净系统,重装系统
bash <(wget --no-check-certificate -qO- 'https://raw.githubusercontent.com/MoeClub/Note/master/InstallNET.sh') -d 12 -v 64 -p "password" -port "22"
#password修改为SSH密码,22修改为端口
PVE官方安装方法
https://pve.proxmox.com/wiki/Install_Proxmox_VE_on_Debian_12_Bookworm

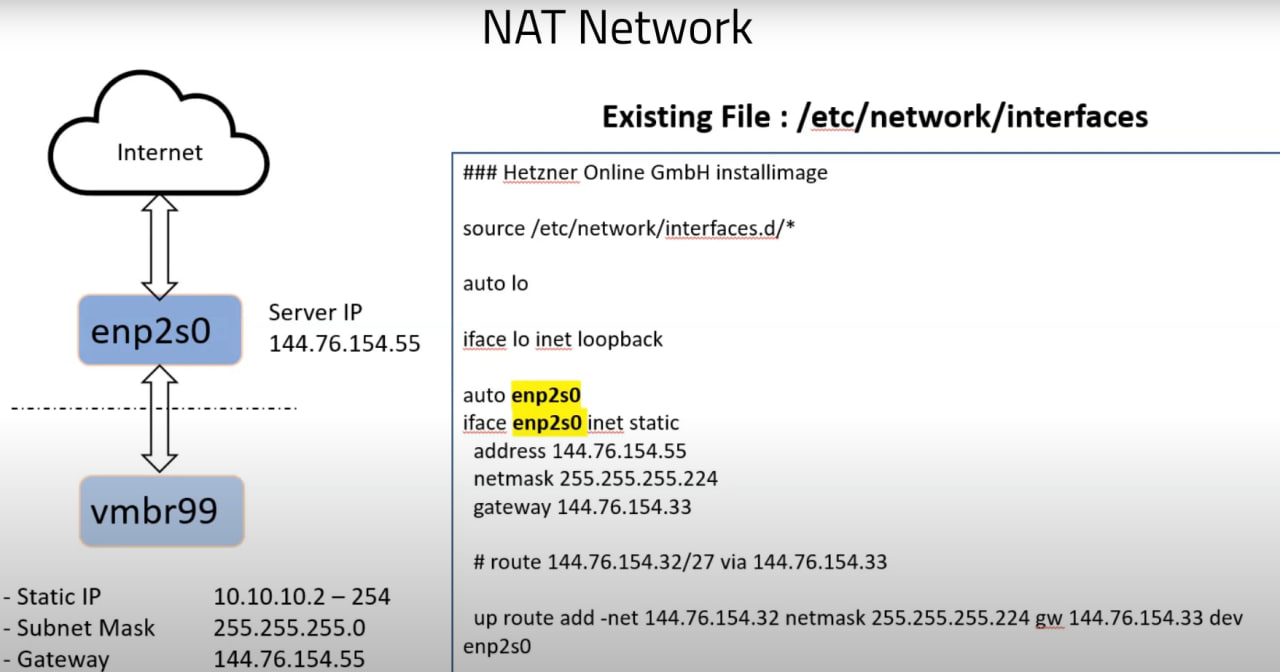
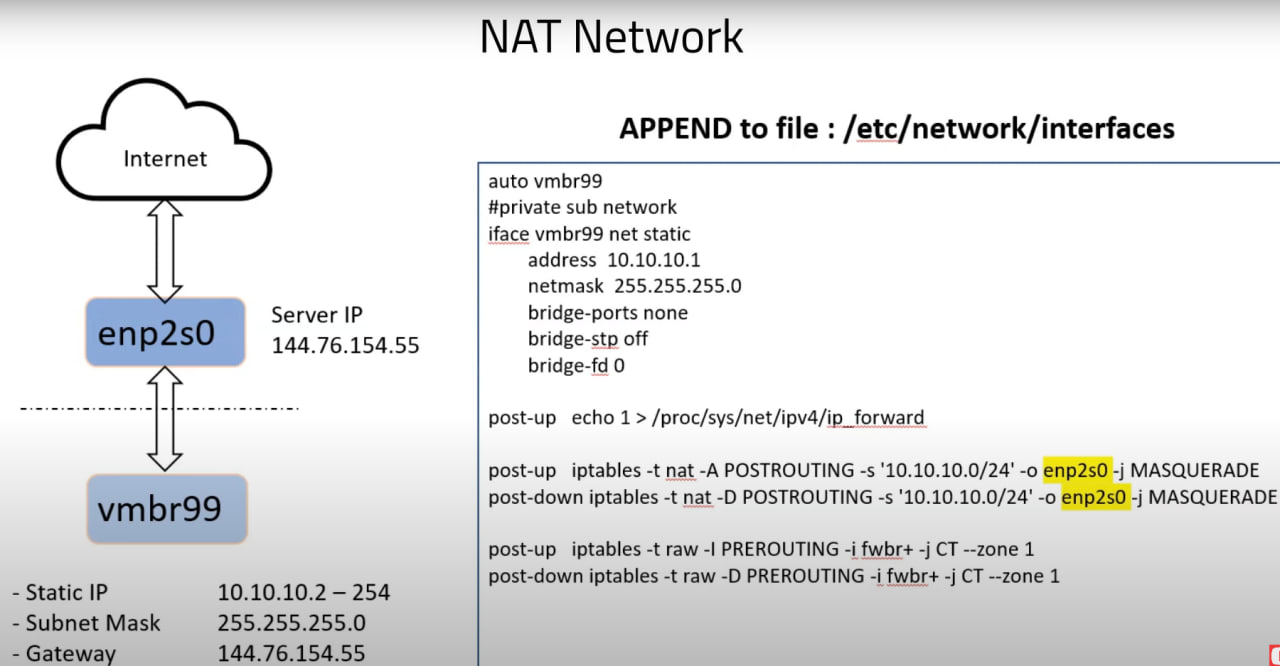
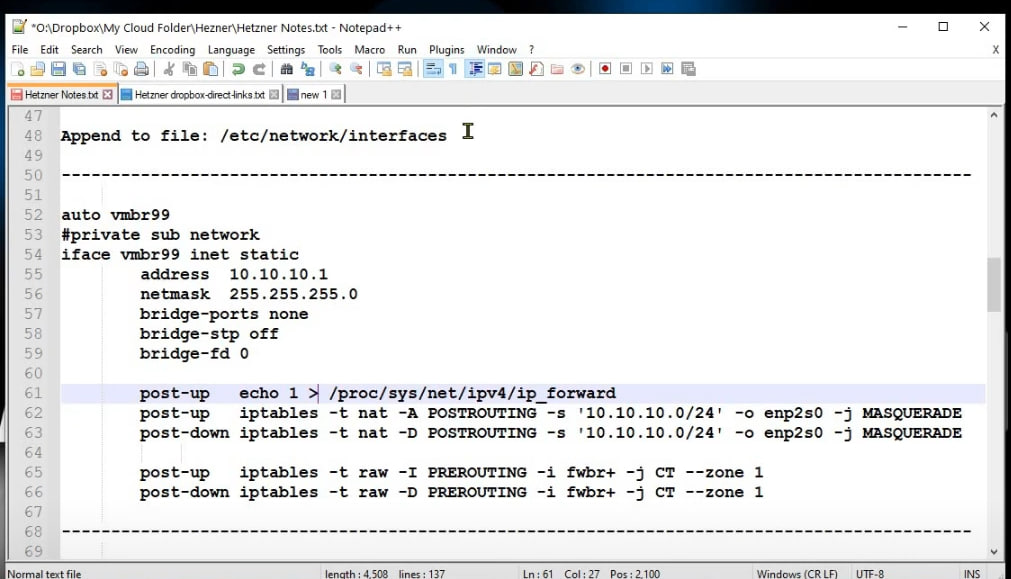
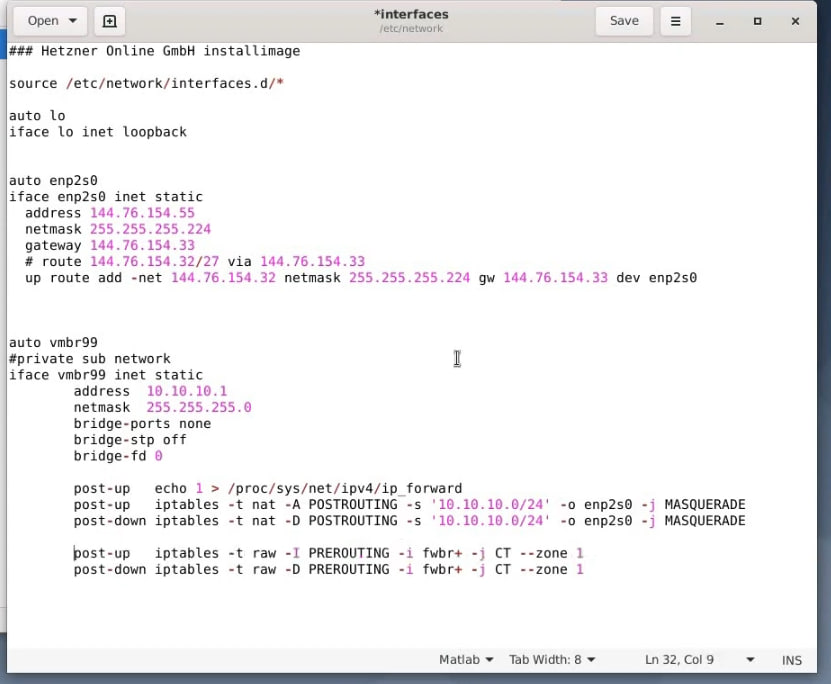
- 复制粘贴桥接还有端口转发命令在/etc/network/interfaces文件内容下面
auto vmbr0
iface vmbr0 inet static
      address 10.10.10.1
      netmask 255.255.255.0
      bridge-ports none
      bridge-stp off
      bridge-fd 0

post-up echo 1 > /proc/sys/net/ipv4/ip_forward

post-up iptables -t nat -A POSTROUTING -s '10.10.10.0/24' -o ens3 -j MASQUERADE
post-down iptables -t nat -D POSTROUTING -s '10.10.10.0/24' -o ens3 -j MASQUERADE

post-up iptables -t raw -I PREROUTING -i fwbr+ -j CT --zone 1
post-down iptables -t raw -D PREROUTING -i fwbr+ -j CT --zone 1
- 修改后重启网络命令
service networking restart
参考教程:https://youtu.be/pgV8B-u9Kps?si=sN9b2DUSSTaybE1N
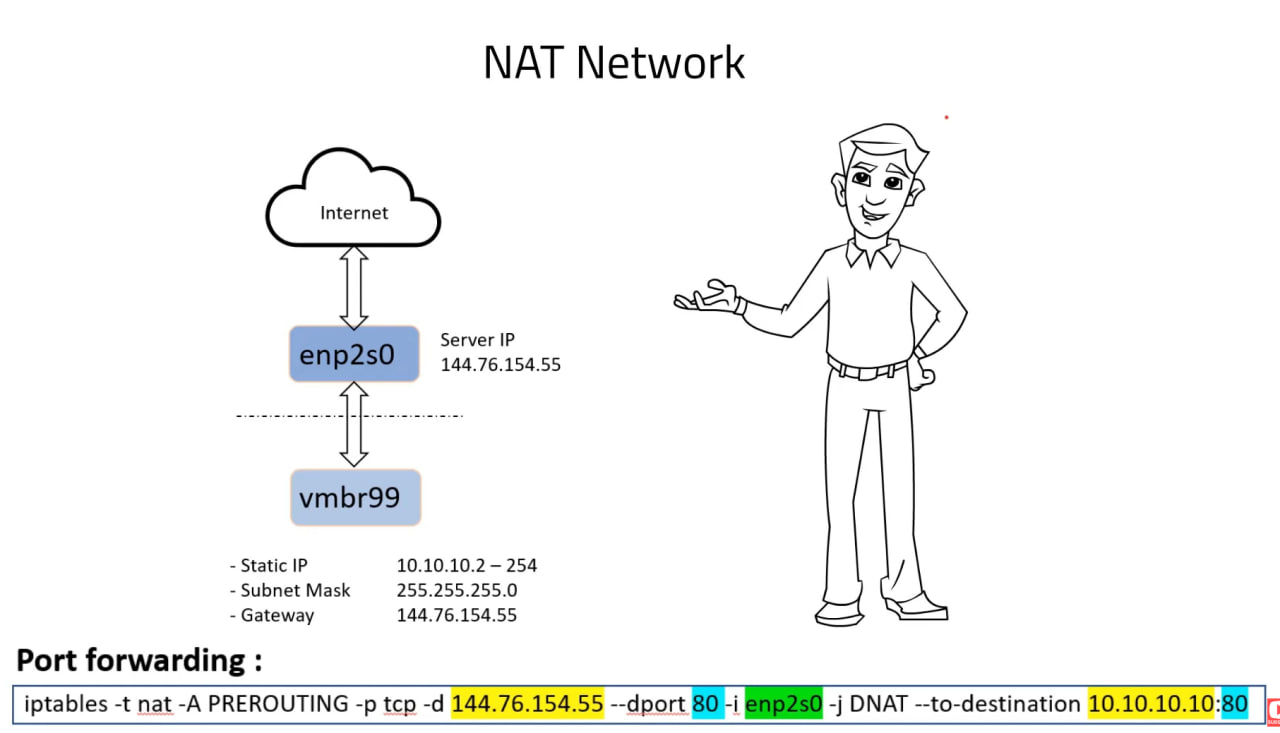
- 内部端口转发外部端口(重启后会重置记录全部记录清除)
iptables -t nat -A PREROUTING -p tcp -d 179.147.184.74 --dport 1246 -i ens3 -j DNAT --to-destination 10.10.10.2:8006
- 内部端口转发外部端口永久记录插件安装
apt-get install iptables-persistent
- 内部端口转发外部端口永久记录命令
iptables-save = /etc/iptables/rules.
- 查看NAT端口转发规则,并显示行号
iptables -t nat --list --line-number
- 删除指定行号的iptables规则
iptables -t nat -D POSTROUTING 10
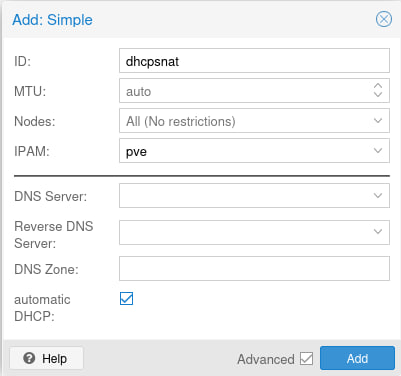
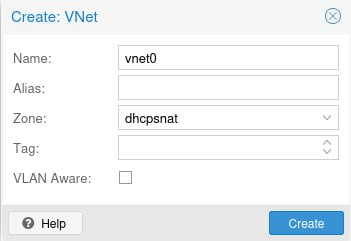
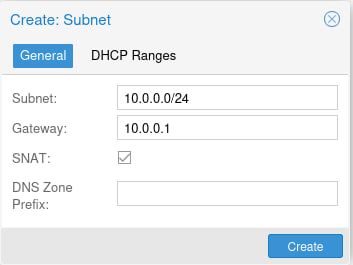
安装SNAT并开启DHCP功能,官方链接:
https://pve.proxmox.com/wiki/Setup_Simple_Zone_With_SNAT_and_DHCP

参考资料:https://blog.einverne.info/post/2021/10/proxmox-ve-config-nat-vm-use-same-public-ip.html
https://www.cnaaa.net/archives/9431
lxc容器安装tailscale设置to reverse proxy to public network for local network
- 在lxc的容器shell里面操作取消注释
nano /etc/sysctl.conf
- 取消原有IPV4和V6转发的注释
net.ipv4.ip_forward=1
和
net.ipv6.conf.all.forwarding=1
#取消原有注释
- 在pve shell中操作在底部增加下面脚本,101为容器号码,随机修改
nano /etc/pve/lxc/101.conf
lxc.cgroup2.devices.allow: c 10:200 rwm
lxc.mount.entry: /dev/net/tun dev/net/tun none bind,create=file
#重启LXC容器生效
- 容器中启动tailscale命令
tailscale up
PVE下正确直通M.2 NVME硬盘详细教程,包括同主控的NVME直通。
在PVE下直通M.2 NVME是需要注意的,不然会轻易把系统盘给直通掉,导致整个系统废了,下面教程将完整的讲解直通步骤。
这里我们分为两个类别讲解
第一个类别是系统盘和扩展的第二块M.2 NVME属于不同品牌的或者说同品牌但使用不同主控的硬盘,那么他们不会使用同一个控制器。
第二个类别是系统盘和扩展的第二块M.2 NVME属于同品牌的或者说不同品牌但使用相同的主控的硬盘,那么他们会使用同一个控制器。
判断自己的PVE安装在哪个系统盘
输入一下命令:
lsblk
使用命令lsblk查看,有pve-root的,便是pve所在的硬盘
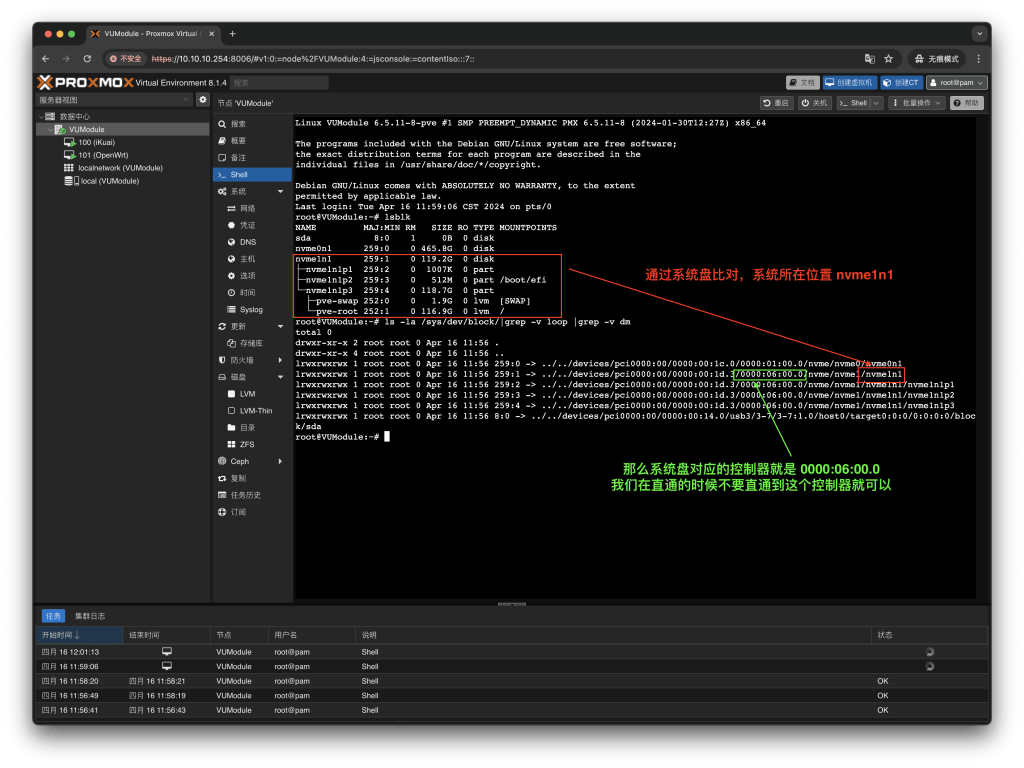
找到系统盘属于哪个控制器,你可以通过下面命令查看
ls -la /sys/dev/block/|grep -v loop |grep -v dm
以上查出来的控制器是属于系统盘的,我们在直通的时候规避这个盘就行
第一个类别直通教程:
第一个类别,我们只需要直通控制器即可,这里以直通给NAS为例
第一个类别,由于系统盘和扩展的NVME硬盘使用的是不用的主控,那么控制器也不相同,所以可以直接直通控制器即可。


第二个类别直通教程:
第二个类别,系统盘和扩展的NVME硬盘属于同一个主控然后就会使用同一个控制器,这样就不能直接直通控制器
输入命令
lspci
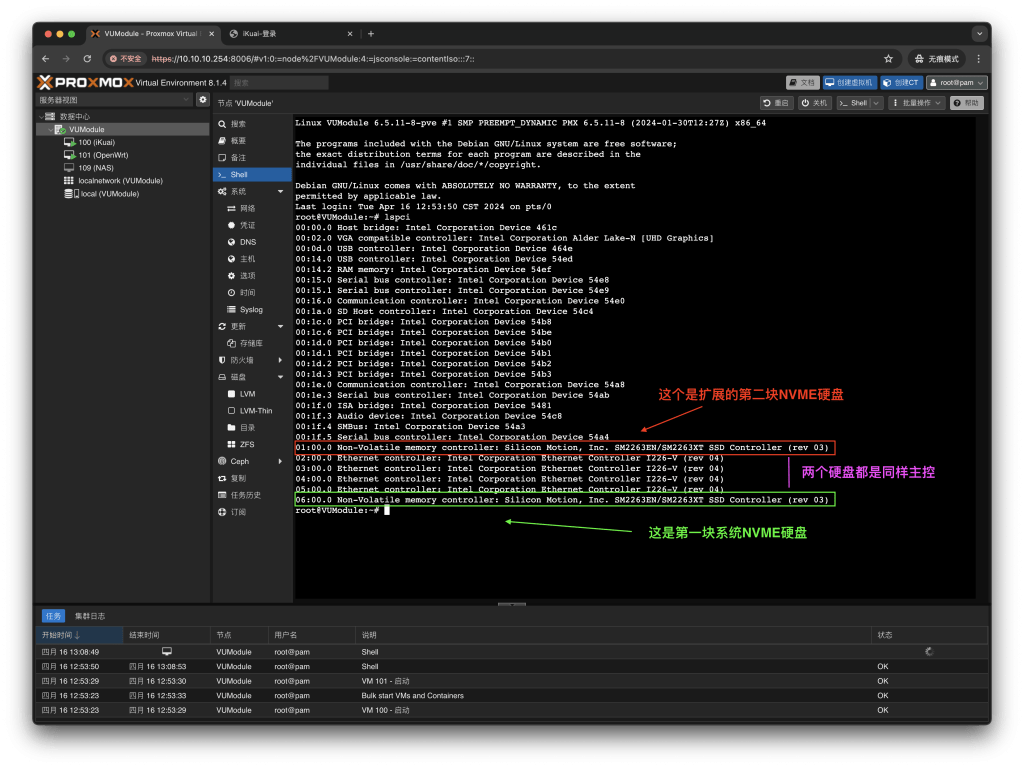
同主控的只能用,磁盘全盘映射的方式,也就是我们俗称的RDM直通
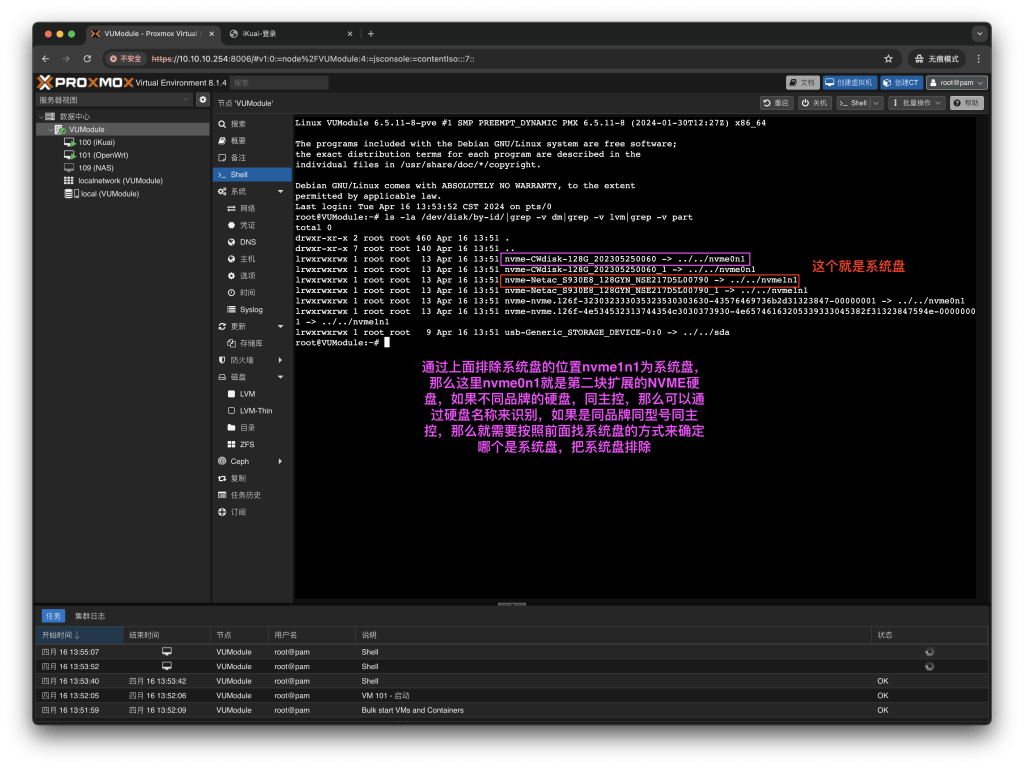
通过下面命令,列出当前的硬盘列表
ls -la /dev/disk/by-id/|grep -v dm|grep -v lvm|grep -v part
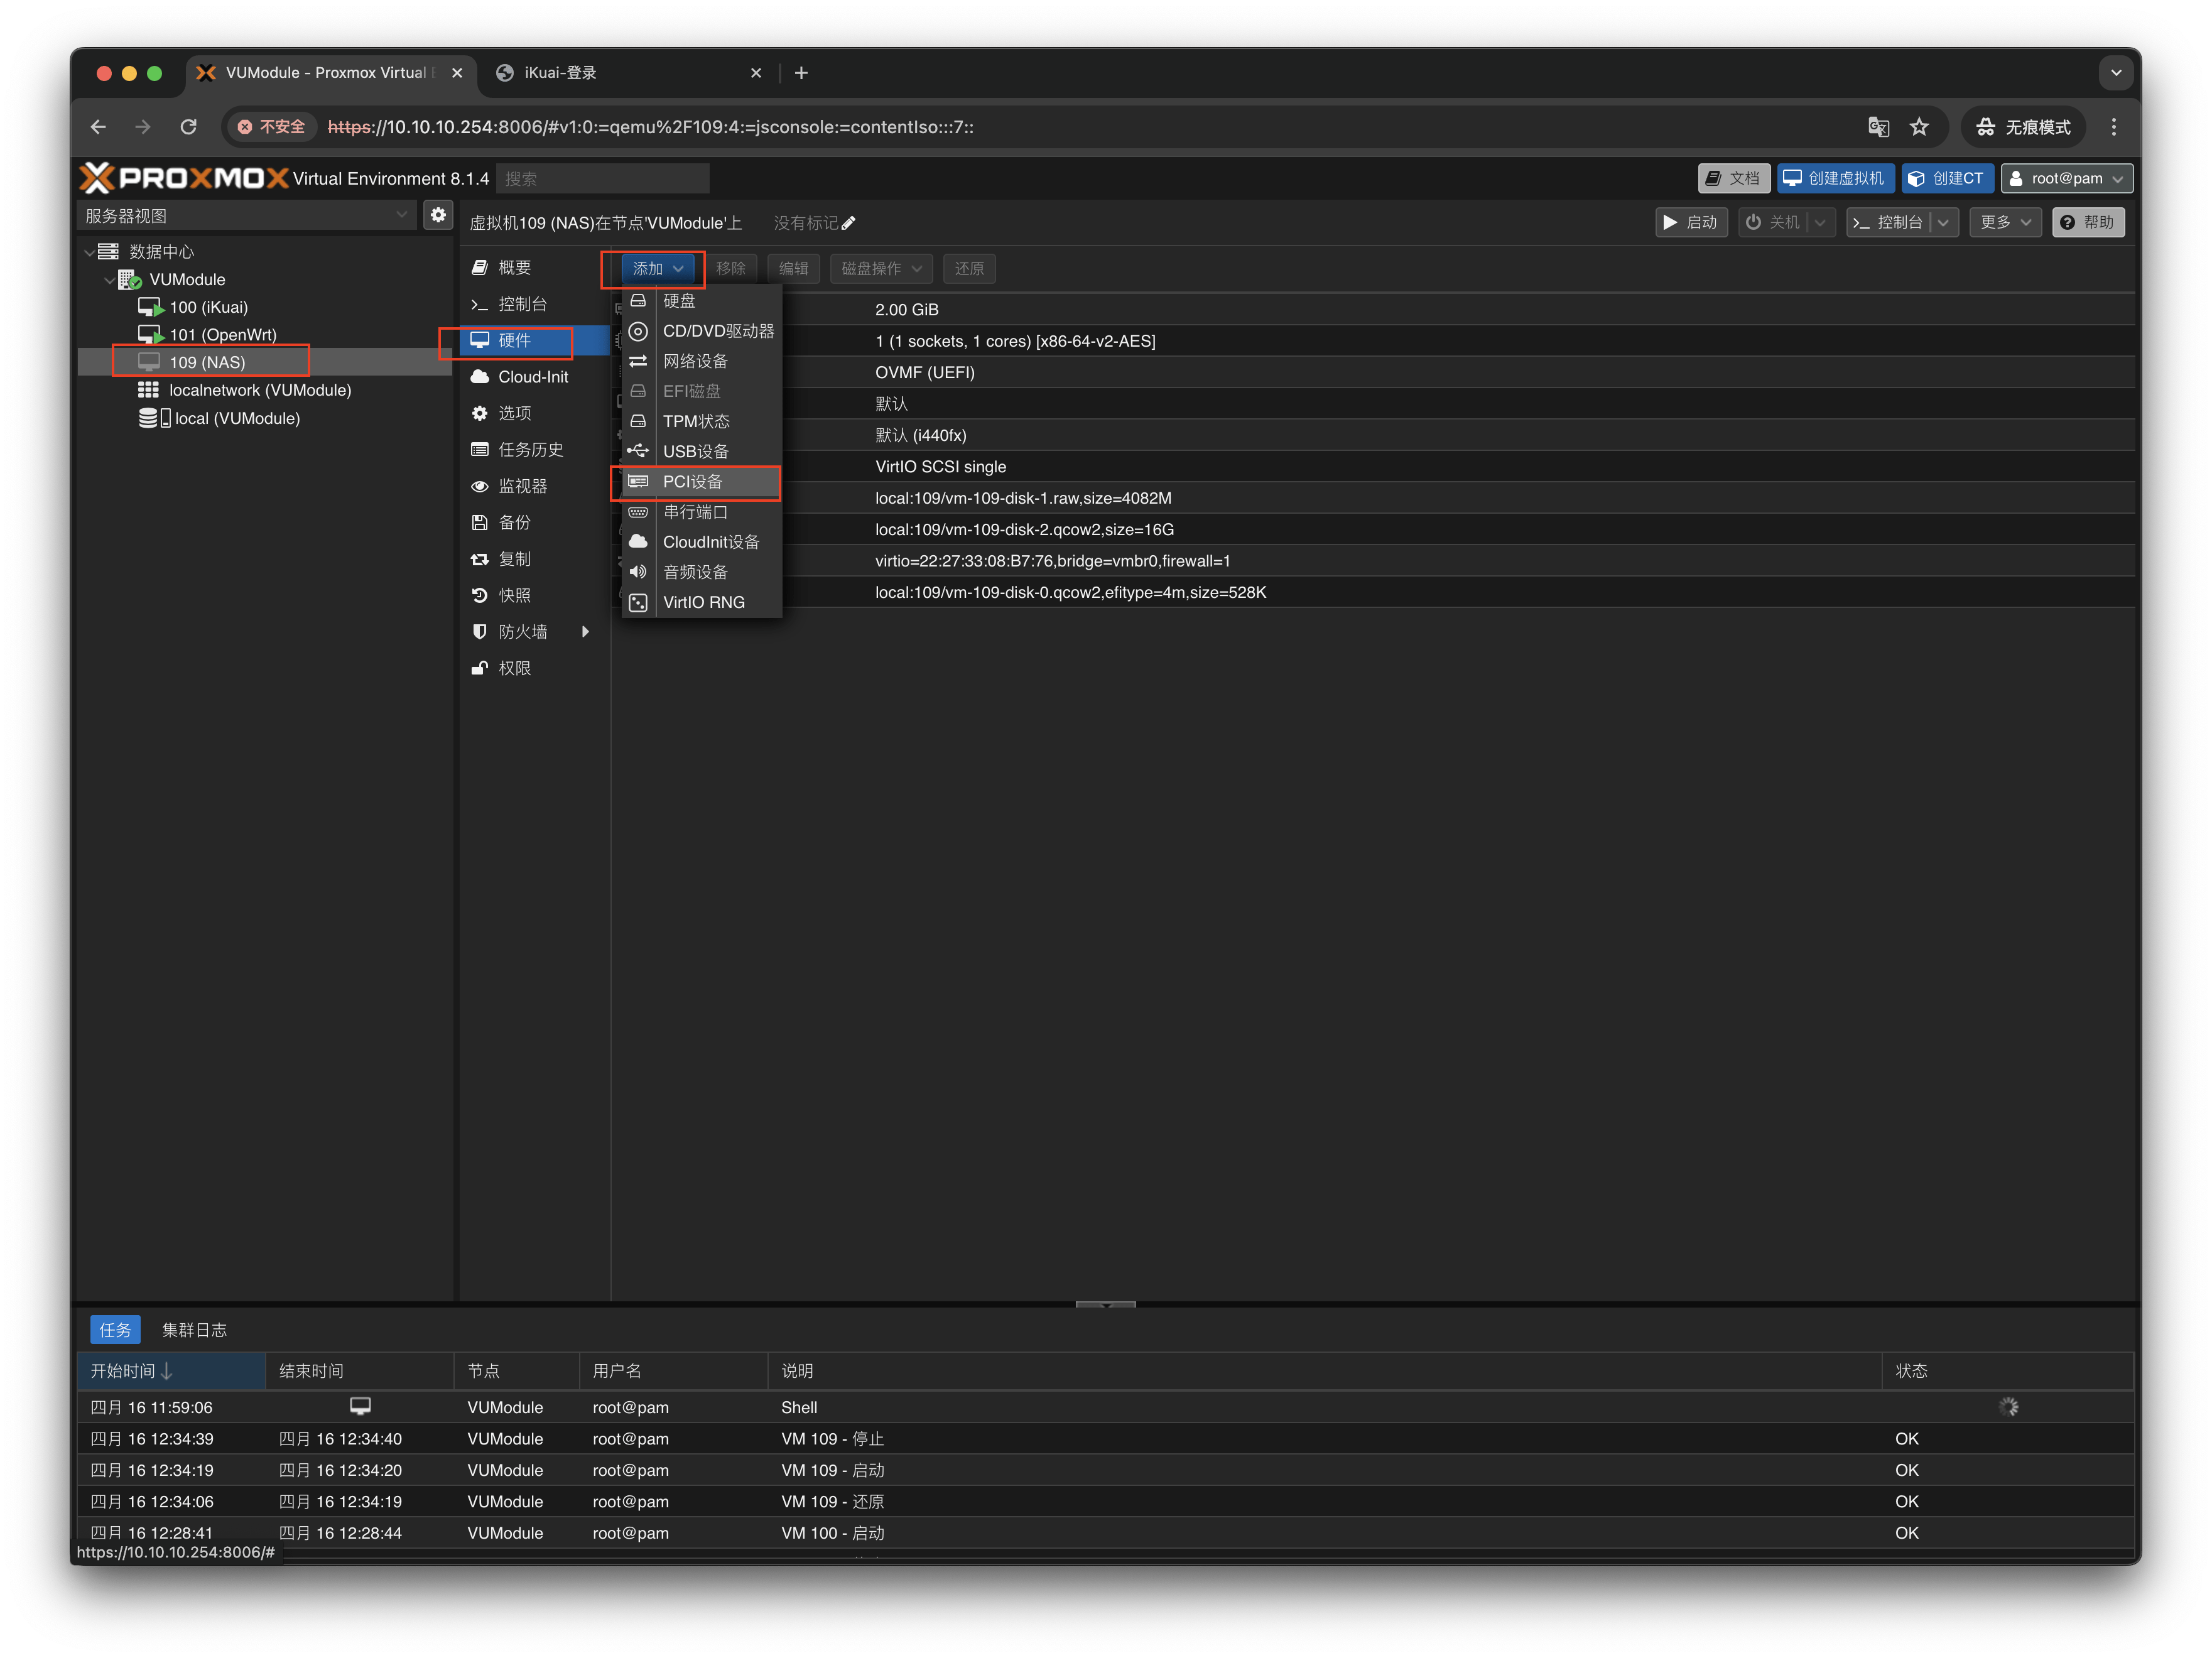
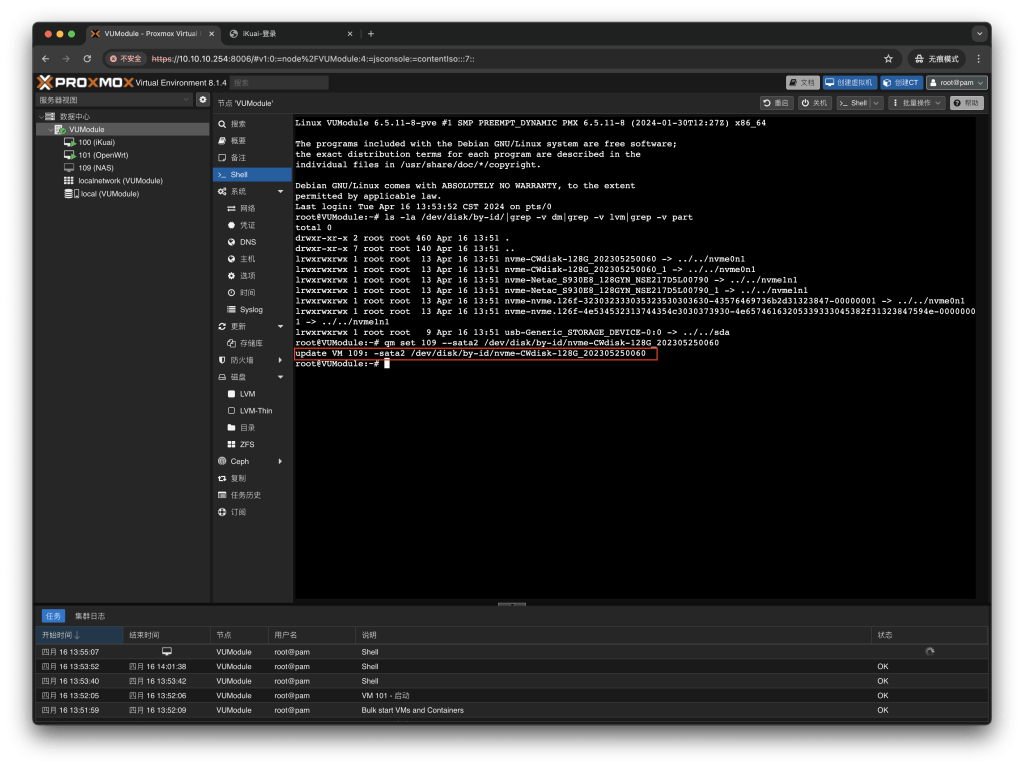
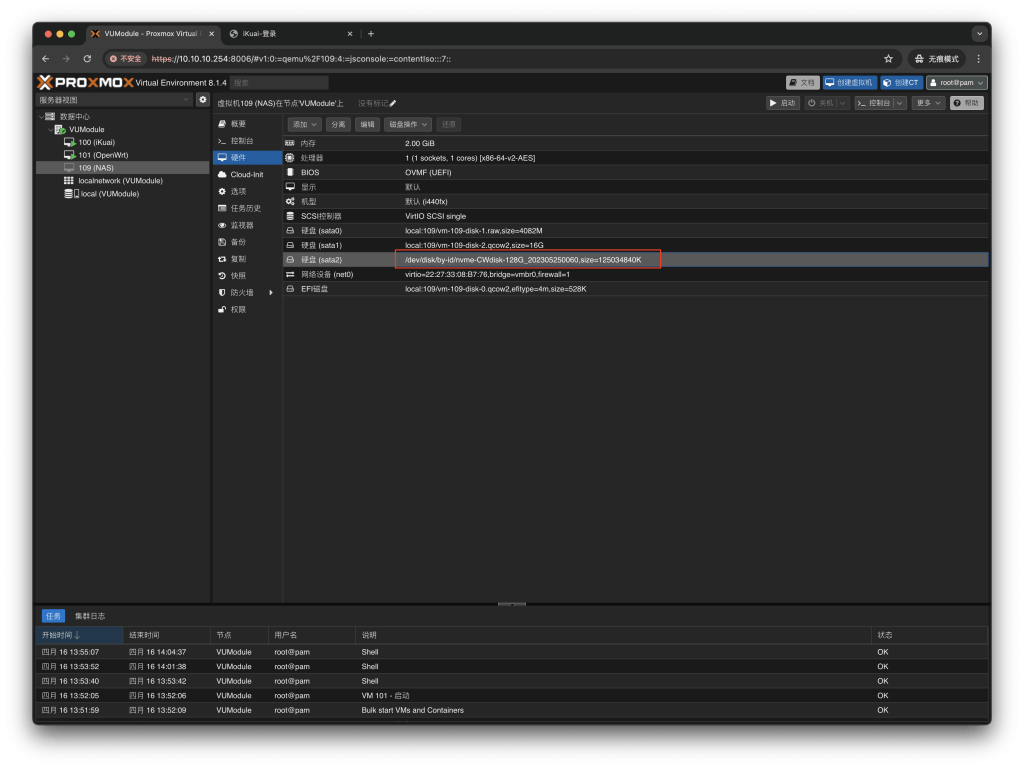
通过一下命令,进行直通,这里演示直通给109的NAS虚拟机
qm set 109 --sata2 /dev/disk/by-id/nvme-CWdisk-128G_202305250060
# 109 代表需要直通给哪个虚拟机,我这里直通给NAS它的ID是109
# sata2 代表直通的控制器是SATA控制器,而且我NAS里面已经有sata0 sata1的硬盘了,以此类推那么我需要添加为sata2
# nvme-CWdisk-128G_202305250060 这里修改为你的第二块 第三块等的 NVME硬盘,上图查询到的名称
原文地址:https://www.vumstar.com/4888/
PVE克隆到新硬盘后,新系统扩容使用所有硬盘空间
安装parted
apt install parted -y
使用parted
parted /dev/sda    #sda为系统root安装盘,根据具体情况修改,一般为sda,也会是sdb,sdc
(parted) print
(parted) resizepart 3 100%   #3为分区号码,sdb3只需要填入3
(parted) quit
调整分区大小 Resize the Physical Volume:
pvresize /dev/sda3
扩展分区100%容量 Extend the Logical Volume:
lvextend -l +100%FREE /dev/mapper/pve-root
调整文件系统容量 Resize the Filesystem:
resize2fs /dev/mapper/pve-root #ext4格式
xfs_growfs / #XFS格式
btrfs格式扩容使用全部容量
- 按照分区挂载路径
btrfs filesystem resize max /
- 按照磁盘分区设备路径
btrfs filesystem resize max /dev/sda3
虚拟盘从一个虚拟机导入另外一个虚拟机,
qemu-img convert -f raw -O raw /var/lib/vz/images/110/vm-110-disk-0.raw /var/lib/vz/images/101/vm-101-disk-0.raw
++++++++++++++++++++++++++++++++++++++++++++++++
1 基础环境配置
1.1 配置 hosts
1.1.1 检查是否启用了 manage_etc_hosts
先 cat /etc/hosts 文件,查看下默认配置,看看有没有一些注释说明该文件是自动设置的(一般 cloud-init 方式安装的系统会有这个),如 vultr 的该文件开头注释:
Your system has configured ‘manage_etc_hosts’ as True.
As a result, if you wish for changes to this file to persist
then you will need to either
a.) make changes to the master file in /etc/cloud/templates/hosts.debian.tmpl
b.) change or remove the value of ‘manage_etc_hosts’ in
/etc/cloud/cloud.cfg or cloud-config from user-data
注释的意思是,你的系统开启了 manage_etc_hosts 功能,如果你想修改 /etc/hosts 内容,有两种办法:
编辑模板文件 /etc/cloud/templates/hosts.debian.tmpl,这种重启后 /etc/hosts 会自动重置为该模板的内容。
修改 /etc/cloud/cloud.cfg 文件,关闭掉 manage_etc_hosts 功能,然后再修改 /etc/hosts。
推荐使用第一种方式。
1.1.2 修改 hosts 文件
需保证 /etc/hosts 文件为下面的内容,第二行要修改为你服务器的 ip 地址和 hostname,如我的 ip 为 45.76.157.191,hostname 为 vultr:
127.0.0.1 localhost
45.76.157.191 vultr.proxmox.com vultr
The following lines are desirable for IPv6 capable hosts
::1 localhost ip6-localhost ip6-loopback
ff02::1 ip6-allnodes
ff02::2 ip6-allrouters
如果你检查到你机器启用了 manage_etc_hosts 功能,不要直接修改 /etc/hosts,而是按照上一步的方式修改,且改完要重启后重新查看 /etc/hosts 确认已经修改成功了噢。
1.2 验证 hosts
然后执行 hostname --ip-address 来查看 hosts 是否配置正确,正常应该返回你机器的 ip,如我 ip 是 45.76.157.191:
root@vultr:~# hostname --ip-address
45.76.157.191
1.3 网络配置
先通过 ifconfig 查看你机器的主要网卡:
root@vultr:~# ifconfig
enp1s0: flags=4163<UP,BROADCAST,RUNNING,MULTICAST> mtu 1500
inet 45.76.157.191 netmask 255.255.254.0 broadcast 45.76.157.255
inet6 fe80::5400:4ff:fe94:96a9 prefixlen 64 scopeid 0x20
inet6 2001:19f0:4400:49aa:5400:4ff:fe94:96a9 prefixlen 64 scopeid 0x0
ether 56:00:04:94:96:a9 txqueuelen 1000 (Ethernet)
RX packets 829 bytes 129892 (126.8 KiB)
RX errors 0 dropped 0 overruns 0 frame 0
TX packets 853 bytes 274794 (268.3 KiB)
TX errors 0 dropped 0 overruns 0 carrier 0 collisions 0
lo: flags=73<UP,LOOPBACK,RUNNING> mtu 65536
inet 127.0.0.1 netmask 255.0.0.0
inet6 ::1 prefixlen 128 scopeid 0x10
loop txqueuelen 1000 (Local Loopback)
RX packets 0 bytes 0 (0.0 B)
RX errors 0 dropped 0 overruns 0 frame 0
TX packets 0 bytes 0 (0.0 B)
TX errors 0 dropped 0 overruns 0 carrier 0 collisions 0
从返回的信息中看到我的网卡名称是 enp1s0,先查看 vim /etc/network/interfaces 文件,原内容为:
network interface settings; autogenerated
Please do NOT modify this file directly, unless you know what
you’re doing.
If you want to manage parts of the network configuration manually,
please utilize the ‘source’ or ‘source-directory’ directives to do
so.
PVE will preserve these directives, but will NOT read its network
configuration from sourced files, so do not attempt to move any of
the PVE managed interfaces into external files!
source /etc/network/interfaces.d/*
auto lo
iface lo inet loopback
auto enp0s2
iface enp0s2 inet dhcp
在最后新增两行,其中 enp1s0 为你的网卡地址,注意检查下,如果你这个配置文件已经默认有该配置了,就不用配了:
auto enp1s0
iface enp1s0 inet dhcp
1.4 禁用 cloud-init 网络配置(可选)
如果你的服务器网络不是使用 cloud-init 设置的,请跳过此部分。如果你不清楚,可以通过检查您的服务器上是否存在 /etc/network/interfaces.d/50-cloud-init 文件来验证这一点,有则说明你需要这一步操作。
先执行 vim /etc/cloud/cloud.cfg.d/99-custom-networking.cfg 编辑文件,内容为:
network: {config: disabled}
保存上面的文件后,执行命令 rm -f /etc/network/interfaces.d/50-cloud-init 删除 cloud-init 网络配置文件。
然后 reboot 重启服务器,重启后请再次执行 hostname --ip-address 来查看 hosts 是否配置正确,正常应该返回你机器的 ip。
2 安装 PVE
2.1 配置 debian 11 国内镜像源 (可选)
debian 11 默认的镜像源可能是国外的,为了加速软件安装,可配置为国内的,如果你不需要,可跳过这一步。
执行命令 vim /etc/apt/sources.list 编辑文件内容为:
deb https://mirrors.tuna.tsinghua.edu.cn/debian/ bullseye main contrib non-free
deb-src https://mirrors.tuna.tsinghua.edu.cn/debian/ bullseye main contrib non-free
deb https://mirrors.tuna.tsinghua.edu.cn/debian/ bullseye-updates main contrib non-free
deb-src https://mirrors.tuna.tsinghua.edu.cn/debian/ bullseye-updates main contrib non-free
deb https://mirrors.tuna.tsinghua.edu.cn/debian/ bullseye-backports main contrib non-free
deb-src https://mirrors.tuna.tsinghua.edu.cn/debian/ bullseye-backports main contrib non-free
deb https://mirrors.tuna.tsinghua.edu.cn/debian-security bullseye-security main contrib non-free
deb-src https://mirrors.tuna.tsinghua.edu.cn/debian-security bullseye-security main contrib non-free
2.2 添加 Proxmox VE 存储库
国外环境用:
echo “deb [arch=amd64] http://download.proxmox.com/debian/pve bullseye pve-no-subscription” > /etc/apt/sources.list.d/pve-install-repo.list
国内可用清华源:
echo “deb [arch=amd64] https://mirrors.tuna.tsinghua.edu.cn/proxmox/debian bullseye pve-no-subscription” > /etc/apt/sources.list.d/pve-install-repo.list
2.3 添加 Proxmox VE 存储库密钥
wget https://enterprise.proxmox.com/debian/proxmox-release-bullseye.gpg -O /etc/apt/trusted.gpg.d/proxmox-release-bullseye.gpg
然后校验下密钥文件是否正确:
sha512sum /etc/apt/trusted.gpg.d/proxmox-release-bullseye.gpg
正常应该返回:
7fb03ec8a1675723d2853b84aa4fdb49a46a3bb72b9951361488bfd19b29aab0a789a4f8c7406e71a69aabbc727c936d3549731c4659ffa1a08f44db8fdcebfa /etc/apt/trusted.gpg.d/proxmox-release-bullseye.gpg
2.4 更新镜像源
apt update -y && apt full-upgrade -y
2.5 安装 Proxmox VE 包
apt install proxmox-ve postfix open-iscsi -y
安装过程如果弹出一个 Postfix Configuration 弹窗,选择 Local Only 回车,然后还有个弹窗会显示你 domain,也直接回车。
安装完后,执行 reboot 重启服务器。重启完就可以通过 https://youripaddress:8006 访问了。
如果访问不了,检查下是不是自带的 ufw 防火墙处于开启状态,需关闭防火墙或开通 8006 端口:
关闭防火墙并禁止开机自启:
systemctl stop ufw
systemctl disable ufw
放行 8006 端口:
ufw allow 8006
3 扩展工作
3.1 移除 os-prober (可选)
pve 官方建议删除 os-prober 软件包:
该 os-prober 软件包会扫描主机的所有分区以创建双引导 GRUB 条目。但扫描的分区还可以包括分配给虚拟机的分区,而虚拟机不希望将其添加为启动项。
简而言之,如果你不需要在服务器上安装双系统,如一个 pve,一个其他系统,您可以安全地删除该 os-prober 软件包 (这不影响在 pve 上开其他系统的 vm 或 lxc):
apt remove os-prober -y;
3.2 配置 CT Template 为清华源 (可选)
如果你需要加速 Proxmox 网页端下载 CT Templates,可以替换 CT Templates 的源。
具体方法:将 /usr/share/perl5/PVE/APLInfo.pm 文件中默认的源地址 http://download.proxmox.com 替换为
https://mirrors.tuna.tsinghua.edu.cn/proxmox
可以使用以下命令一键修改:
cp /usr/share/perl5/PVE/APLInfo.pm /usr/share/perl5/PVE/APLInfo.pm_back
sed -i ‘s|http://download.proxmox.com|https://mirrors.tuna.tsinghua.edu.cn/proxmox|g’ /usr/share/perl5/PVE/APLInfo.pm
重启后生效。
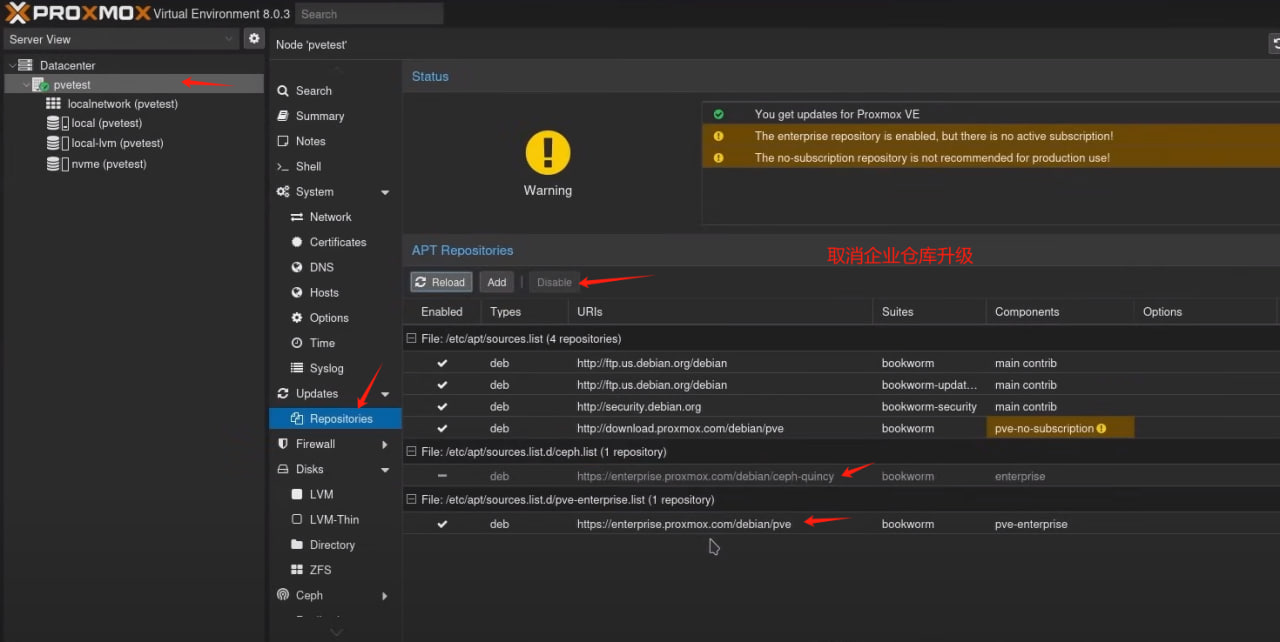
3.3 禁用企业源
企业源是要收费的,不禁用掉的话,你 apt update 时会报错:
Err:7 https://enterprise.proxmox.com/debian/pve bullseye InRelease
401 Unauthorized [IP: 2407:6180:1🅰️70dc:f0ff:fe97:4cbb 443]
Reading package lists… Done
E: Failed to fetch https://enterprise.proxmox.com/debian/pve/dists/bullseye/InRelease 401 Unauthorized [IP: 2407:6180:1🅰️70dc:f0ff:fe97:4cbb 443]
E: The repository ‘https://enterprise.proxmox.com/debian/pve bullseye InRelease’ is not signed.
N: Updating from such a repository can’t be done securely, and is therefore disabled by default.
N: See apt-secure(8) manpage for repository creation and user configuration details.
禁用方式为编辑 /etc/apt/sources.list.d/pve-enterprise.list 文件,注释掉第一行(即在第一行最前面加个 #),修改完执行 apt update 验证下没有上面的那个报错就是禁用成功了。
3.4 屏蔽登录后弹窗
由于我们不是付费的订阅用户,所以 pve 会在登录后弹窗提示:
You do not have a valid subscription for this server. Please visit www.proxmox.com to get a list of available options.
可通过以下命令屏蔽:
sed -i.bak “s/data.status.toLowerCase() !== ‘active’/false/g” /usr/share/javascript/proxmox-widget-toolkit/proxmoxlib.js && systemctl restart pveproxy
命令含义是编辑 /usr/share/javascript/proxmox-widget-toolkit/proxmoxlib.js 文件替换文件中内容 data.status !== ‘Active’ 为 false,并将原文件备份为 .bak 后缀,然后重启 pve 服务。
修改完可以重新登录 pve 验证是否还有弹窗,如果还有检查下是不是浏览器缓存,如果还是不行,可能你用的版本不适用这个修改方式,请重新在搜索引擎搜索你所用 pve 版本的去除弹窗方式。
4 开 lxc 容器
4.1 下载 LXC 模板
点击左侧磁盘图标的 local(机器hostname),然后选 CT 模板,点 模板,选择要下载的系统模板,然后下载即可。
4.2 创建 LXC 容器
点击 pve 网页右上角的 创建 CT,按照提示填写即可,网络中:
桥接 选择 vmbr0 网卡
IPv4 选择静态
IPv4/CIDR:写 10.10.10.100/24,其中 10.10.10.100 是容器 IP 地址。
网关(IPv4):写 10.10.10.1
其他的保持默认即可。
添加完,启动即可。
4.3 添加 ssh 服务并允许 root 登录
启动 lxc 容器后,先使用宿主机 ping 一下,确保可以 ping 通,然后就可以通过控制台连接了,如果控制台连接不上,可点击右上方的选项,使用其他方式的控制台访问,进入到服务器 shell 命令行后输入账号密码登录,接下来执行命令安装 ssh 服务,可远程连接:
如果是 centos,则需要安装 ssh 服务:
yum install openssh-server
systemctl start sshd.service
systemctl enable sshd.service
如果是 debian/ubuntu,默认已安装 ssh,但禁止了 root 用户登录,需开启:
sed -i ‘/PermitRootLogin /c PermitRootLogin yes’ /etc/ssh/sshd_config
systemctl restart sshd
sed -i ‘/PermitRootLogin /c PermitRootLogin yes’ /etc/ssh/sshd_config
systemctl restart sshd
sed -i ‘/PermitRootLogin /c PermitRootLogin yes’ /etc/ssh/sshd_config
systemctl restart sshd
宿主机磁盘格式zfs,lxc 容器无法恢复早于最近的快照修复
用以下命令从快照直接创建LXC
pct clone
评论区